
Baking chicken wings might seem straightforward, but achieving that ultra-crispy skin without deep frying takes a little know-how. I’ve spent years dialing in the perfect oven technique that turns simple wings into a crackly, savory snack. It’s a method that relies on dry heat and a good, hot oven—no fancy equipment required.
What I love about this approach is how forgiving it is. No oil splatters, no mess, just wings that come out golden and crispy on the outside, juicy inside. Plus, the smell of roasted chicken, with a hint of smoky paprika or garlic, fills the whole kitchen—kind of like a Sunday game day but any night of the week.
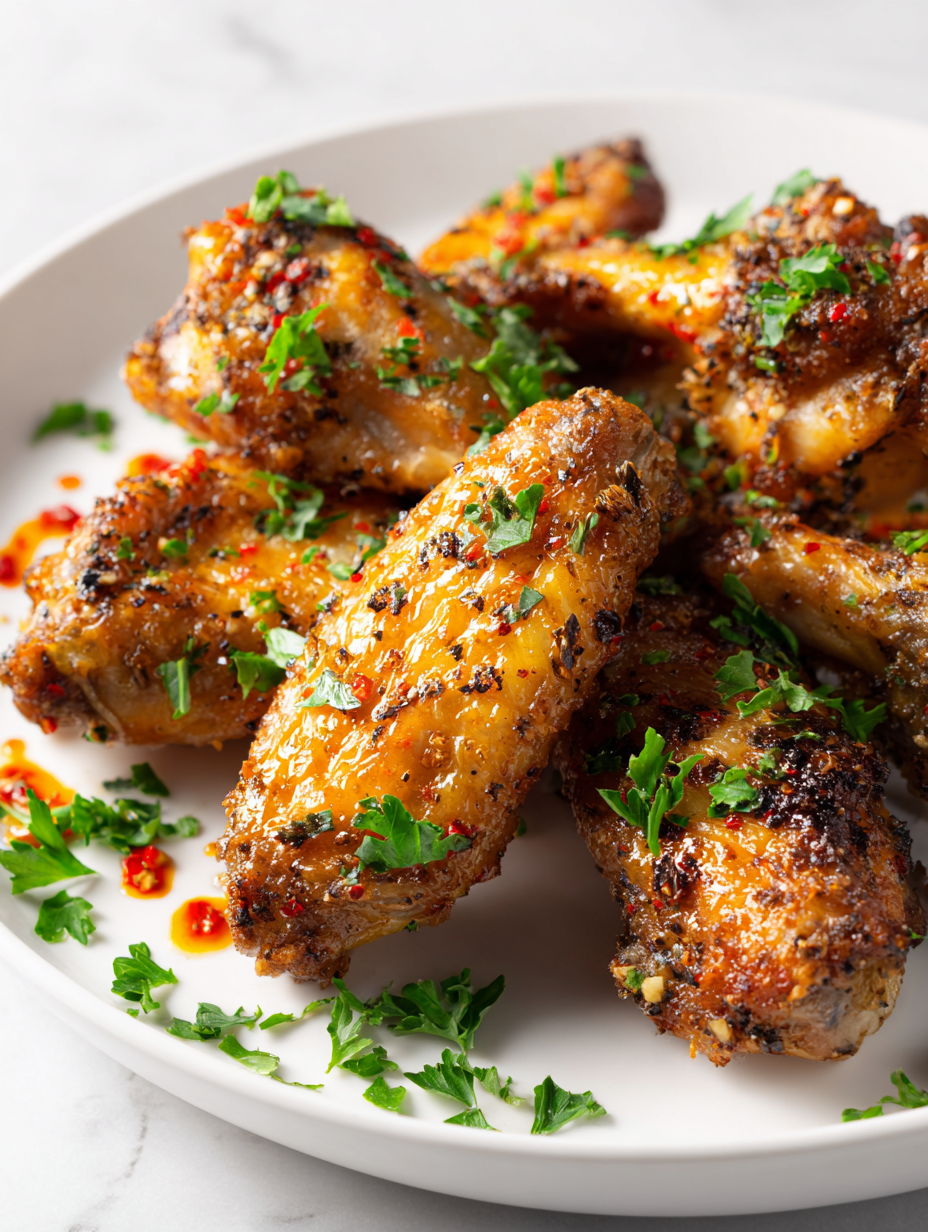
Focusing on achieving ultra-crispy skin without deep frying, using a simple baking technique that transforms humble chicken wings into a crackly, oven-baked treat.
The story behind this recipe
- This recipe came together after a messy first attempt at crispy wings in the oven. I was tired of greasy fried wings and wanted that crackly skin without all the fuss and splatter. One day, I just threw a bunch of spices and some baking soda into the mix and hoped for the best.
- Turns out, the baking soda trick really works—puffs up the skin and helps it crisp up beautifully. Now, I keep that in mind whenever I want a quick, satisfying snack that feels indulgent but isn’t fried. It’s become my go-to for game nights, lazy weekends, and whenever I need comfort food that’s easy to toss together.
- heading
- story_type
Ingredient breakdown
- Chicken wings: I prefer fresh, meaty wings with plenty of skin for that crispy contrast. If yours are frozen, thaw thoroughly for even cooking.
- Baking soda: A pinch helps the skin puff and crisp up—don’t overdo it or the flavor gets metallic. Just a light dusting is enough.
- Salt: It’s my secret weapon for flavor enhancement. Be generous but balanced; too much can make the skin overly salty.
- Paprika or smoked paprika: Adds a subtle smoky depth and vibrant color. Skip if you want a milder profile, or try chili powder for heat.
- Oil (optional): A light coat can help with browning, but I often skip it for a cleaner, less greasy finish. Use a neutral oil if you do.
- Garlic powder: I love its savory punch. Fresh garlic works too, but powder distributes more evenly during baking.
- Black pepper: Freshly cracked for a bit of bite—don’t skip it, but keep it moderate to avoid overpowering the smoky notes.
Spotlight on key ingredients
Chicken wings:
- I prefer fresh, meaty wings with plenty of skin for that crispy contrast. If yours are frozen, thaw thoroughly for even cooking.
- Baking soda: A pinch helps the skin puff and crisp up—don’t overdo it or the flavor gets metallic. Just a light dusting is enough.
- Salt: It’s my secret weapon for flavor enhancement. Be generous but balanced; too much can make the skin overly salty.
Paprika and oil:
- Paprika or smoked paprika: Adds a subtle smoky depth and vibrant color. Skip if you want a milder profile, or try chili powder for heat.
- Oil (optional): A light coat can help with browning, but I often skip it for a cleaner, less greasy finish. Use a neutral oil if you do.
Notes for ingredient swaps
- Dairy-Free: Skip butter or dairy-based sauces. Use olive oil or avocado oil for crispiness and flavor.
- Low-Sodium: Use unsalted or reduced-salt seasoning blends. Enhance flavor with herbs and spices instead.
- Sweetener Swap: Instead of honey or sugar in glaze, try agave syrup or maple syrup for a different sweetness profile.
- Spice Level: For milder wings, skip cayenne or chili powders. Use smoked paprika for depth without heat.
- Herb Variants: Replace traditional herbs with fresh parsley or cilantro for a brighter, fresh flavor.
- Oil Choices: Use sesame oil for a nutty aroma or coconut oil for a subtle sweetness—adjust seasoning accordingly.
- Vinegar Options: Swap apple cider vinegar with rice vinegar for a milder tang, especially in dips or sauces.
Equipment & Tools
- Oven: To bake the wings evenly at high heat.
- Baking sheet with foil: To catch drips and simplify cleanup.
- Wire rack: To elevate wings for air circulation, promoting crispness.
- Large mixing bowl: To toss wings with seasoning evenly.
- Tongs: To handle hot wings safely and evenly distribute them on the rack.
Step-by-step guide to baked wings
- Preheat your oven to 220°C (430°F). Place a baking rack inside a baking sheet; this allows air to circulate and helps crisp the skin. Line the sheet with foil for easy cleanup.
- Pat the chicken wings dry with paper towels. Removing excess moisture is key to crispy skin. In a large bowl, toss wings with a pinch of baking soda (about 1/2 teaspoon per pound). This will help puff up the skin during baking.
- Add salt, smoked paprika, garlic powder, black pepper, and a light drizzle of neutral oil (if using). Toss thoroughly so each wing is coated evenly. The seasoning and oil will promote browning.
- Arrange the wings on the wire rack in a single layer, skin side up. Space them out so air can circulate freely. This step is crucial for even crisping.
- Bake for 35-40 minutes. After 20 minutes, check for golden color and crispy skin. If wings look pale, increase oven temp slightly or broil for 2-3 minutes, watching carefully to avoid burning.
- Once crispy and golden, remove from oven. Let rest for 5 minutes before tossing with your favorite sauce or serving as is. Resting helps juices redistribute and keeps the skin crackly.
- Serve immediately, ideally with a side of cooling coleslaw or crunchy pickles to balance the richness.
Let the wings rest on the rack for 5 minutes. Toss with sauce if desired, or serve straight from the rack for maximum crunch. Plate and enjoy hot.
How to Know It’s Done
- Skin is deeply golden and crackly, not pale or soggy.
- Internal temperature reaches at least 75°C (165°F) when tested with a probe.
- Juices run clear when pierced, with no pinkness.
Oven-Baked Crispy Chicken Wings
Ingredients
Equipment
Method
- Preheat your oven to 220°C (430°F). Line a baking sheet with foil and place a wire rack on top to elevate the wings and promote air circulation.
- Pat the chicken wings dry thoroughly with paper towels until no moisture remains; this step is key for crispy skin.
- Place the wings in a large mixing bowl and sprinkle with a light dusting of baking soda and salt. Toss well to evenly coat; the baking soda will help the skin puff and crisp as it bakes.
- Add smoked paprika, garlic powder, and a drizzle of neutral oil to the bowl. Toss again until each wing is coated with the spices and oil, which will aid in browning.
- Arrange the seasoned wings on the wire rack in a single layer, skin-side up, making sure they are spaced out for maximum crispness.
- Bake the wings for 35-40 minutes, turning on the oven's convection or broil function in the last few minutes if needed, until the skin is deeply golden and crackly.
- Remove the wings from the oven and let them rest for 5 minutes on the rack; this allows juices to settle and enhances the crunchiness.
- Serve immediately, enjoying the crackly skin and tender meat. Toss with your favorite sauce or enjoy plain for that classic crispy wing experience.
Pro tips for crispy baked wings
- Start with a super hot oven—around 220°C (430°F)—to get that initial sizzle and crackle.
- Dry wings thoroughly before seasoning—moisture is the enemy of crisp skin. Pat with paper towels until no dampness remains.
- Toss wings with baking soda and salt early—this combo puffs the skin and enhances browning. Just a pinch of baking soda per pound.
- Arrange wings skin-side up and spaced out on a wire rack—air circulation is key for even crispiness and no soggy bottoms.
- Broil for 2-3 minutes at the end if wings aren’t golden enough—watch closely to prevent burning and get that perfect crackle.
- Rest wings for 5 minutes after baking—this helps juices settle and keeps the skin delightfully crackly when served.
- Use tongs to handle wings hot from the oven—avoids breaking the crispy skin and keeps you from burns.
Common mistakes and how to fix them
- FORGOT to dry wings thoroughly → Pat dry to prevent soggy skin.
- DUMPED too much baking soda → Use just a light pinch for crispiness.
- OVER-TORCHED wings under broiler → Watch closely to avoid burning.
- MISREAD oven temperature → Use an oven thermometer for accuracy.
Quick fixes and pantry swaps
- When wings look pale, splash with a little vinegar to brighten flavors and shimmer.
- If skin isn’t crispy, patch with broiler for 2 minutes, crackling smell confirms perfection.
- Dumped too much baking soda? Rinse wings quickly and dry thoroughly before baking again.
- When wings stick to the rack, shield with parchment paper or lightly oil the surface.
- Splash a little lemon juice if wings turn too salty, adding brightness and balancing richness.
Prep, store, and reheat tips
- You can prep the wings by drying and seasoning them a day in advance. Keep covered in the fridge; the skin benefits from air-drying overnight, which enhances crispiness.
- Store cooked wings in an airtight container in the fridge for up to 3 days. Reheat in a hot oven (about 180°C/350°F) for 10-15 minutes until crispy and hot, with a crackly exterior and juicy inside.
- Raw wings can be frozen for up to 2 months. Thaw thoroughly in the fridge overnight before baking. The texture remains good, but avoid overfreezing to prevent freezer burn.
- The flavors deepen slightly after resting, so consider tossing cooked wings in sauce just before serving or reheating to preserve freshness.
- Reheating might soften the skin slightly; to revive crunch, broil for 2-3 minutes, watching carefully for that golden crackle and smoky aroma.
Top questions about baked chicken wings
1. Why do my wings turn out soggy?
Use chicken wings that are as dry as possible; pat them with paper towels before baking. This helps the skin crisp up and prevents sogginess.
2. What’s the best oven temperature for crispy wings?
Bake at a high temperature, around 220°C (430°F), and use a wire rack to allow air circulation. This ensures a crackly, crispy skin.
3. How does baking soda help crisp the wings?
A light dusting of baking soda makes the skin puff and crisp up. Just a pinch per pound is enough, too much can taste metallic.
4. Should I rest the wings before serving?
Rest the wings for 5 minutes after baking to let juices redistribute and keep the skin crackly when served.
5. How do I know when the wings are done?
Use a cooking thermometer to check that internal temperature hits at least 75°C (165°F). The skin should be golden and crackly.
6. Can I skip the oil for baking?
Skip adding too much oil—just a light coating helps browning. Too much oil can make the wings greasy and less crispy.
7. Why are my wings not crispy even after baking?
Arrange wings skin-side up and spaced out on a wire rack to promote even crispness and prevent steaming.
8. How do I fix wings that burn or brown unevenly?
If wings brown too quickly, lower the oven temp slightly or cover loosely with foil. Broiling at the end can add extra crunch.
9. How do I reheat baked wings to keep them crispy?
Reheat leftovers in an oven at 180°C (350°F) for 10-15 minutes until crispy again. Avoid microwaving, which softens the skin.
10. When should I add sauce to baked wings?
For extra flavor, toss baked wings in your favorite sauce or seasoning right after baking, while still warm for better adhesion.
These baked chicken wings are a go-to for nights when I want something satisfying but straightforward. The crackly skin paired with tender meat always hits just right, especially when I can smell that smoky paprika aroma filling the kitchen. It’s a reminder that good food doesn’t need to be complicated or fried to be memorable.
Whenever I make them, I’m reminded how simple tweaks—like drying the wings thoroughly or arranging them properly—can make all the difference. It’s honest, unpolished cooking that rewards patience and attention. No matter the occasion, these wings bring a little bit of real, honest comfort.