Homemade mozzarella sticks have always been a go-to for me when I want a snack that hits all the right notes—crispy, cheesy, a little salty. But I’ve started playing around with an unexpected addition: a sprinkle of fresh herbs in the breading. It’s subtle, but it makes the familiar feel new, kind of like a secret handshake for your taste buds.
There’s something comforting about biting into that first gooey, crispy layer—like a warm hug in snack form. Making them at home means I can control the quality of the cheese and the crunch, plus experiment with flavors that remind me of childhood, but with a little twist to keep it interesting.
Focusing on the nostalgic comfort of homemade mozzarella sticks, but with an unexpected twist—using a secret blend of herbs in the breading for a fragrant punch that elevates this classic snack.
Herbs in the Breading
- Making these mozzarella sticks always takes me back to late nights at the diner, where the smell of fried cheese filled the air with anticipation.
- I love experimenting with different herbs in the breading—last week, a pinch of smoked paprika added a surprising depth that my kids couldn’t get enough of.
- There’s a tiny thrill in watching the cheese melt just right, stretching like a lazy Sunday morning, before the crispy shell seals it all in.
The story behind this recipe
Making mozzarella sticks at home started as a quick fix for my late-night snack cravings, but it turned into a small ritual. The smell of melting cheese and crispy breading reminds me of childhood weekends, spent sneaking bites while my parents cooked in the kitchen. Over time, I learned that the secret isn’t just in the cheese—it’s in the balance of crunch and goo, and how a little patience in frying can turn simple ingredients into something special. Now, it’s a messy, joyful process I turn to whenever I need a quick burst of comfort and nostalgia.
Trivia and Origins
- Mozzarella sticks gained popularity in American diners in the 1970s, blending Italian cheese with fast-food flair.
- The first commercial frozen mozzarella sticks appeared in the 1980s, making them a household snack staple.
- In Italy, similar fried cheese snacks exist but are often made with different cheeses and herbs, reflecting regional tastes.
Key Ingredients and Tips
- Mozzarella cheese: I love using fresh, high-moisture mozzarella that melts beautifully and stretches with a gooey pull—look for the kind with a mild, milky flavor. Swap for a semi-soft cheese if you prefer a firmer bite.
- Breadcrumbs: I prefer panko for that extra crunch, the coarse texture gives a satisfying bite. You can mix in grated Parmesan for salty depth or go gluten-free with crushed almonds for a nutty twist.
- Eggs: Whisking eggs helps the breading stick, but adding a splash of water makes it easier to coat evenly—plus, it lightens the batter’s texture.
- Herbs & spices: Fresh parsley or basil add brightness, while smoked paprika introduces a smoky undertone. Feel free to experiment with Italian seasoning or garlic powder for a flavor boost.
- Oil for frying: I use vegetable or canola oil for a neutral, high-heat fry—look for shimmering, not smoking, to prevent burning. A deep-fry thermometer is your best friend here.
- Flour (optional): Dredging in a bit of seasoned flour before egg helps the coating adhere better, especially if your cheese tends to leak. Skip if you want a lighter crust.
- Seasonings: A pinch of salt and pepper in the breading enhances overall flavor—don’t forget to taste and adjust before frying for that perfect savory punch.
Spotlight on key ingredients
Mozzarella cheese:
- I love using fresh, high-moisture mozzarella that melts beautifully and stretches with a gooey pull—look for the kind with a mild, milky flavor. Swap for a semi-soft cheese if you prefer a firmer bite.
- Breadcrumbs: I prefer panko for that extra crunch, the coarse texture gives a satisfying bite. You can mix in grated Parmesan for salty depth or go gluten-free with crushed almonds for a nutty twist.
- Eggs: Whisking eggs helps the breading stick, but adding a splash of water makes it easier to coat evenly—plus, it lightens the batter’s texture.
Breadcrumbs and oil:
- Herbs & spices: Fresh parsley or basil add brightness, while smoked paprika introduces a smoky undertone. Feel free to experiment with Italian seasoning or garlic powder for a flavor boost.
- Oil for frying: I use vegetable or canola oil for a neutral, high-heat fry—look for shimmering, not smoking, to prevent burning. A deep-fry thermometer is your best friend here.
- Breadcrumbs: I prefer panko for that extra crunch, the coarse texture gives a satisfying bite. You can mix in grated Parmesan for salty depth or go gluten-free with crushed almonds for a nutty twist.
Notes for ingredient swaps
- Dairy-Free: Swap mozzarella for firm, dairy-free cheese like cashew-based or soy-based varieties. Expect a slightly firmer, less oozy result.
- Gluten-Free: Use almond meal or gluten-free panko instead of traditional breadcrumbs. Keeps the crunch but may be a tad less airy.
- Low-Sodium: Choose unsalted cheese and season the breading with herbs and spices instead of salt. Be mindful of cheese salt content.
- Vegan: Use vegan cheese sticks and plant-based egg replacers like aquafaba or commercial egg substitutes. Keep an eye on melting behavior.
- Herb Variations: Incorporate different dried herbs or spice blends into the breadcrumb coating. Adds new flavor dimensions with minimal fuss.
- Oil Choices: Swap vegetable oil with avocado or light olive oil for a slightly richer flavor and different smoke point. Watch for subtle taste shifts.
- Cheese Type: Try other melting cheeses like provolone or Monterey Jack for varied flavor profiles and textures, especially if you want a sharper or milder taste.
Equipment & Tools
- Deep skillet or Dutch oven: For frying the mozzarella sticks evenly and safely.
- Thermometer: To monitor the oil temperature precisely.
- Parchment-lined baking sheet: To drain excess oil and cool the fried sticks.
- Three shallow dishes: For breading station—flour, eggs, and panko mixture.
- Slotted spoon: To gently lift and drain fried sticks.
Step-by-step guide to mozzarella sticks
- Equipment setup: Get a deep, heavy-bottomed skillet or Dutch oven, a thermometer, and a baking sheet lined with parchment. The thermometer is crucial for maintaining oil temperature.
- Prepare the cheese: Cut mozzarella into 1/2-inch sticks. Freeze them for about 30 minutes to prevent melting too quickly during frying.
- Breading station: Set up three shallow dishes—one with seasoned flour, one with beaten eggs, and one with panko breadcrumbs mixed with herbs and spices.
- Coat the sticks: Dip each frozen mozzarella stick into flour, then egg, then panko, pressing lightly to adhere. Repeat if you want an extra thick crust.
- Heat the oil: Pour oil into your skillet or pot, enough to submerge the sticks. Heat to 180°C (356°F). When the oil shimmers but doesn’t smoke, you’re ready.
- Fry in batches: Carefully lower a few sticks into the hot oil. Fry for 2–3 minutes, turning gently, until golden and crispy. The cheese should be just starting to melt inside.
- Check for doneness: The coating should be deep golden, cheese slightly oozing but not leaking excessively, and smell fragrant with herbs.
- Drain and rest: Use a slotted spoon to transfer sticks to paper towels. Let rest for 2 minutes to set the crust and prevent cheese from escaping when biting.
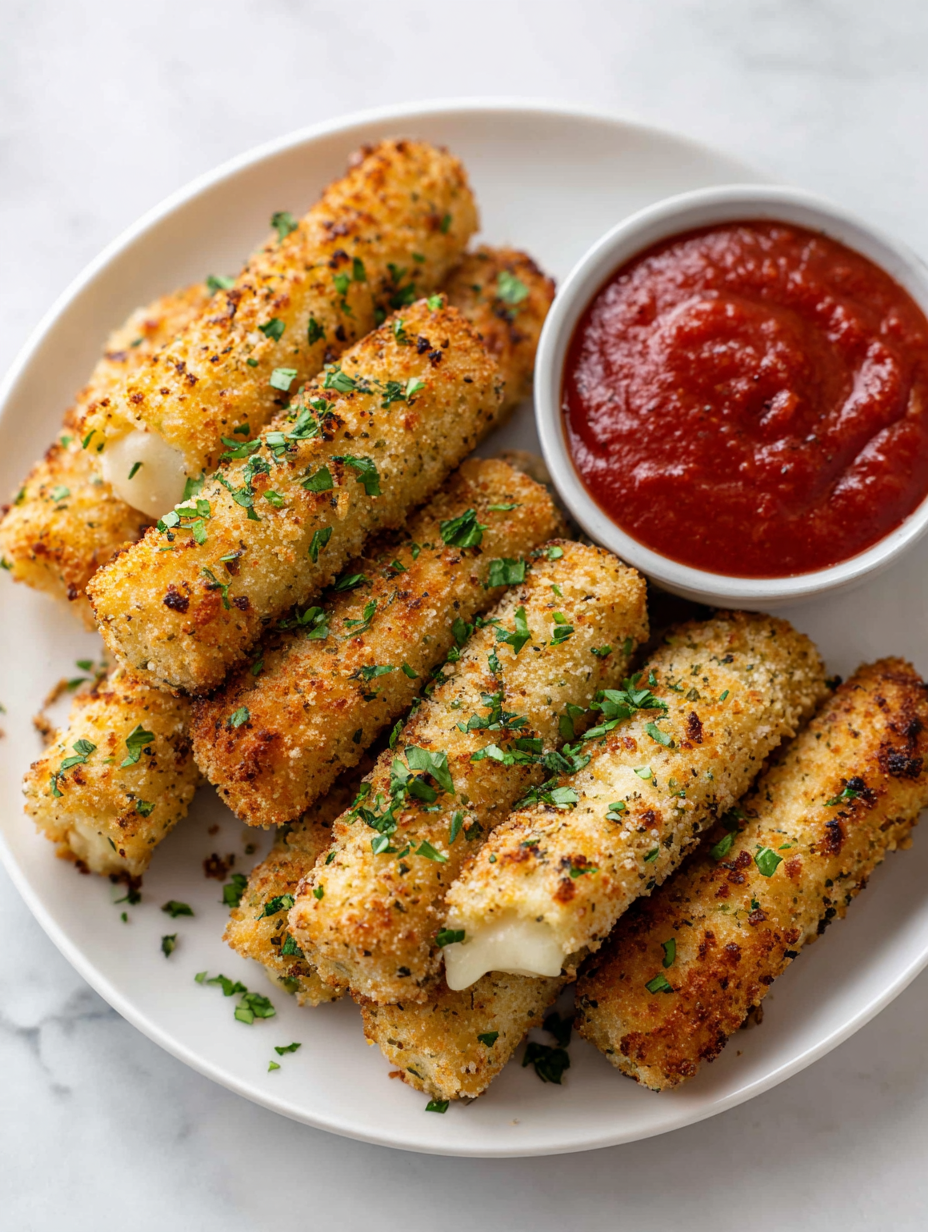
- Serve immediately: Plate the mozzarella sticks hot, with a side of marinara or your favorite dip. The cheese should be gooey and the shell crisp.
Let the fried mozzarella sticks rest for 2 minutes on paper towels. Serve immediately with a side of marinara or your favorite dip. The cheese inside should be gooey and warm, while the shell remains crisp.
How to Know It’s Done
- Oil at 180°C (356°F) with a shimmering surface and no smoke.
- Golden-brown crust with a slight jiggle in the cheese when gently pressed.
- Cheese inside melts gently and stretches when bitten, without leaking excessively.
Herb-Infused Homemade Mozzarella Sticks
Ingredients
Equipment
Method
- Arrange the mozzarella cheese sticks on a baking sheet and freeze for about 30 minutes. This helps prevent the cheese from melting too quickly during frying.
- Mix the panko breadcrumbs with the finely chopped herbs in a shallow dish for a fragrant, crunchy coating.
- Place the flour in a separate shallow dish, and beat the eggs in another bowl for the breading station.
- One by one, dredge each frozen mozzarella stick in flour, shaking off excess. Then dip into the beaten eggs, letting the excess drip off.
- Press the coated mozzarella into the herb-panko mixture, ensuring an even, thick coat. Repeat with all sticks and chill for 10 minutes if desired.
- Heat the vegetable oil in a deep skillet or Dutch oven to 180°C (356°F), checking with a thermometer until shimmering and hot.
- Carefully lower a few mozzarella sticks into the hot oil, frying in batches. Cook for 2–3 minutes, turning gently, until golden brown and crispy.
- Use a slotted spoon to remove the fried sticks, draining on paper towels to remove excess oil.
- Let the mozzarella sticks rest for 2 minutes to set the crust and prevent cheese leaks. Serve warm with marinara or your favorite dip.
Notes
Pro tips for crispy mozzarella sticks
- Use panko for that extra crunch, it creates a satisfying crispy shell.
- Chill the breaded sticks for at least 30 minutes; it helps the coating stay put during frying.
- Maintain oil temperature at 180°C (356°F); use a thermometer to avoid soggy or burnt crusts.
- Fry in small batches—overcrowding drops temperature and makes the coating soggy.
- Turn sticks gently; too vigorous and the crust might crack, causing cheese leaks.
- Rest the fried sticks for 2 minutes on paper towels; this helps set the crust and keeps cheese gooey inside.
Common mozzarella stick mistakes and fixes
- FORGOT to monitor oil temperature → Use a thermometer to prevent burning.
- DUMPED cheese too early → Wait for cheese to just start melting inside.
- OVER-TORCHED crust → Lower heat or remove sooner to avoid burning.
- MISSED resting time → Let sticks rest 2 minutes to set the crust and prevent cheese leaks.
Quick fixes and pantry swaps
- When cheese leaks, splash cold water on the oil to stop the bubbling.
- If sticks are soggy, patch with an extra crispy coating and fry briefly again.
- DUMPED the oil temperature? Shield with fresh oil at 180°C (356°F) for consistent crispiness.
- Splash a pinch of salt on freshly fried sticks for a flavor boost when they seem bland.
- When in doubt, pantry swap panko for crushed cornflakes for an instant crunch boost.
Prep, store, and reheat tips
- Prepare the breaded mozzarella sticks up to 24 hours in advance; keep them uncovered in the fridge to maintain crispness.
- Freeze the sticks for at least 1 hour before frying to prevent cheese from melting too quickly and causing leaks.
- Store cooked mozzarella sticks in an airtight container in the fridge for up to 2 days; reheat in the oven until crispy and cheese is warm.
- Reheat from frozen in a 180°C (356°F) oven for 8–10 minutes; avoid microwave to keep the coating crispy and prevent sogginess.
- The flavor remains fairly intact after storage, but cheese may be slightly less gooey; best enjoyed hot and fresh for full texture.
Top questions about mozzarella sticks
1. What cheese works best?
Use high-moisture mozzarella for the best stretch and melt. Low-moisture cheese won’t be as gooey.
2. Do I need to freeze the cheese first?
Freeze the sticks for about 30 minutes before frying to prevent cheese from leaking out.
3. How hot should the oil be?
Maintain oil at 180°C (356°F). Use a thermometer to keep the temperature steady for crispy coating.
4. How many sticks at once?
Fry in small batches to avoid oil temperature drops, which can make the coating soggy.
5. Should I drain the mozzarella sticks?
Drain on paper towels immediately after frying to remove excess oil and keep them crispy.
6. When should I serve them?
Serve them hot right out of the fryer for the best gooey cheese and crispy shell.
7. Can I customize the coating?
Use panko breadcrumbs for extra crunch, and consider adding herbs or Parmesan for flavor.
8. How do I reheat them?
Reheat leftovers in a 180°C (356°F) oven for 8–10 minutes until crispy and hot inside.
9. What if the cheese leaks out?
If cheese leaks, check oil temperature and fry in smaller batches to prevent overcooking.
10. Can I make them dairy-free?
For a dairy-free version, try firm plant-based cheeses; expect a firmer texture and less gooeyness.
Biting into a freshly fried mozzarella stick, with that perfect balance of crispy shell and molten cheese, always takes me back to simpler times. It’s a small, satisfying pleasure I crave during busy weekends or lazy nights at home. Sometimes, the best comfort is right in your own kitchen, just a few ingredients and a little bit of patience.
No matter how many versions I try, nothing beats that moment when the cheese stretches just right, releasing a fragrant, cheesy steam. It’s these tiny, homemade moments that remind me why I love cooking—finding joy in the messy, imperfect process and in those gooey, crispy bites that feel like a little victory.

Hi, I’m James Whitmore, the creator behind Salt Evangelist. If there is one ingredient I believe deserves more respect, it is salt. Not because it makes food salty, but because it makes food come alive. Salt highlights sweetness, softens bitterness, sharpens acidity, and deepens savoriness. It is not just seasoning. It is transformation.

