These vegetable samosas turn the usual snack on its head by highlighting the brightness of seasonal greens and root vegetables. Using fresh, vibrant produce makes each bite feel lively and aligned with spring’s promise of renewal. It’s a way to celebrate what’s in season while sneaking in a bit of veggie goodness.
I love how the unexpected crunch of snap peas or the sweet earthiness of roasted carrots can transform a classic into something fresh and exciting. Plus, they’re surprisingly forgiving — you can swap in what’s ripe or leftover, making these samosas a flexible, no-fuss appetizer for any gathering or lazy weekend snack.
There’s something satisfying about folding up a pocket of seasoned, veggie-packed filling, then frying it to golden perfection. It’s a humble recipe, but with a punch of flavor and that crispy exterior — it just feels like a little celebration in every bite.
Focusing on the unexpected use of seasonal vegetables that add a fresh, vibrant twist to traditional samosas, making them a perfect appetizer for spring gatherings or a lively picnic spread.
Reviving Tradition with Seasonal Veggies
- Discovering how a dash of spice can elevate humble vegetables into something unforgettable, turning a simple snack into a conversation starter.
- I still remember the first time I nailed that perfect golden crisp — the moment of pride when the kitchen filled with that irresistible fried aroma.
- Nostalgia hits hard with these samosas—reminding me of lazy weekend afternoons spent cooking with family, laughter echoing over spicy, flaky bites.
- I love how adaptable this recipe is; swapping seasonal veggies keeps it fresh, and it always feels like a little culinary adventure.
- Frying these up on a quiet afternoon makes the house smell like a festival, and honestly, that’s the best kind of cozy.
Reviving Tradition with Seasonal Veggies
- Making vegetable samosas has always been a way for me to use up odds and ends from the fridge. I like how seasonal produce can turn a simple snack into something lively and fresh. It’s a bit of a messy process, but that’s part of the fun—filling the kitchen with aromas of spices and frying oil.
- One spring, I was experimenting with leftover carrots, peas, and a handful of spinach. The result was so vibrant and satisfying, I knew I had to write down the process. It’s become my go-to for casual gatherings or just when I want a little crunch and spice without much fuss.
- heading
- story_type
Historical & Cultural Insights
- Samosas likely originated from Central Asia before becoming a staple in Indian cuisine, with recipes evolving over centuries.
- Early versions of samosas were often filled with meat or lentils, but vegetable fillings gained popularity with vegetarian movements in India.
- The flaky, crispy exterior is traditionally made with a simple flour dough, which has remained largely unchanged for generations.
- During British colonial times, samosas became a popular snack among workers and traders, spreading their reach across South Asia.
- Today, vegetable samosas are celebrated worldwide, often customized with local spices and seasonal vegetables, reflecting regional tastes.
Ingredient breakdown: key components
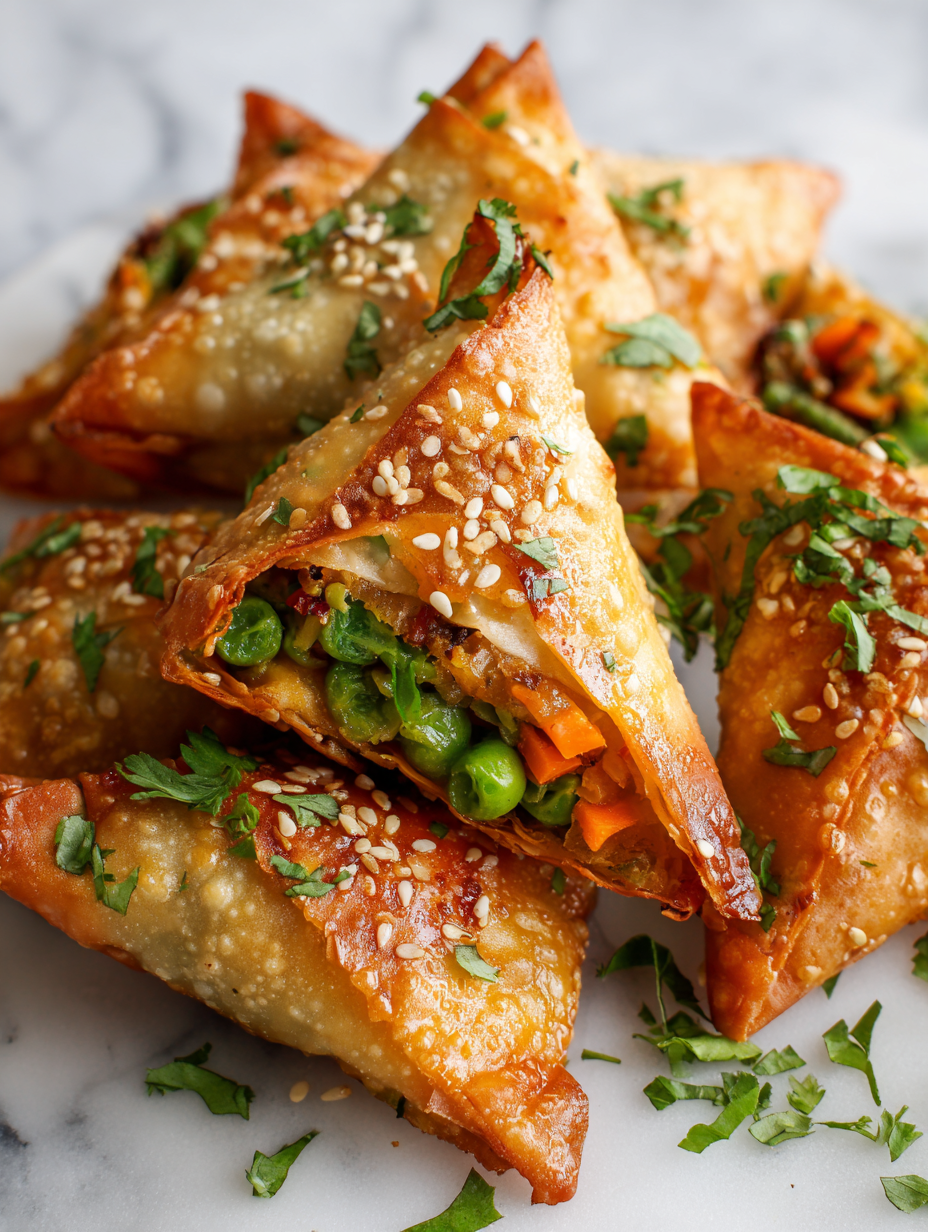
- Potatoes: I use starchy white potatoes for that fluffy interior and sturdy hold; if you prefer a lighter bite, try sweet potatoes—just watch their moisture. The aroma of boiling potatoes makes the kitchen feel cozy.
- Peas: Fresh or frozen peas add a sweet pop that brightens the filling. Frozen peas are more forgiving—just thaw and drain well. Their vibrant green color is a visual cue for freshness.
- Carrots: Roasted carrots bring a smoky sweetness; if you’re in a rush, sauté raw grated carrots instead. The earthy scent when they cook is a sure sign they’re ready.
- Spices: Cumin, coriander, and a pinch of garam masala are my staples. Toast them briefly in oil until fragrant—your kitchen will fill with warm, spicy notes that make you smile. Adjust to taste, but don’t skip the coriander for that citrusy brightness.
- Dough: I prefer a simple flour-based pastry that’s crispy and flaky. Keep your butter or oil cold when mixing—this step is key for that tender, crackly shell. A little egg wash helps achieve that golden glow.
- Oil: Use a neutral oil with a high smoke point like canola or sunflower. When heated to about 180°C (356°F), you’ll hear that satisfying crackle as the samosas hit the oil—perfect timing for golden perfection.
- Lemon juice: A squeeze of fresh lemon brightens the filling just before sealing. The zing cuts through the richness and adds a fresh, vibrant layer to each bite—don’t skip it!
Spotlight on key ingredients
Potatoes and Peas:
- Potatoes: I prefer starchy white potatoes for their fluffy texture and sturdy hold. Their aroma when boiling is a cozy sign they’re ready. If you want a lighter bite, try sweet potatoes—just watch out for extra moisture.
- Peas: Fresh or frozen, they add a sweet pop of color and flavor. Frozen peas are forgiving—just thaw and drain thoroughly. Their vibrant green hue signals freshness and sweetness.
Notes for ingredient swaps
- Dairy-Free: Swap traditional butter or ghee in the dough for coconut oil or vegan margarine. The pastry may be slightly less flaky, but still tender and crisp.
- Gluten-Free: Use a blend of rice flour and tapioca starch instead of wheat flour. The texture will be a bit more delicate and crumbly, so handle with care.
- Vegetable Filling: Replace potatoes with sweet potatoes for a sweeter, softer bite. Roasted or boiled, they add a caramel note and vibrant color.
- Spice Level: Omit or reduce garam masala and chili powder if you prefer milder samosas. Add fresh herbs like cilantro or mint for a fresh twist.
- Peas: Use fresh peas instead of frozen for a brighter flavor and firmer texture. If unavailable, thaw frozen peas thoroughly and drain well.
- Oil: For a lighter version, bake the samosas at 200°C (392°F) for 20-25 minutes until crispy—less oil, still tasty.
- Lemon Juice: Substitute with a splash of lime juice or a vinegar-based tang, which adds brightness without overshadowing the filling’s spice.
Equipment & Tools
- Knife: Chop and dice vegetables and herbs.
- Chopping board: Provide a stable surface for cutting.
- Mixing bowl: Combine filling ingredients.
- Rolling pin: Roll out dough evenly.
- Frying pan or deep fryer: Cook the samosas in hot oil.
- Slotted spoon: Remove fried samosas from oil.
- Paper towels: Drain excess oil and crisp up the samosas.
Step-by-step guide to vegetable samosas
- Gather all ingredients and tools: a sharp knife, a chopping board, a mixing bowl, a rolling pin, a frying pan or deep fryer, slotted spoon, and paper towels for draining.
- Prepare the filling: Dice roasted carrots, boil potatoes until tender (about 15 minutes at 100°C/212°F), and thaw peas. Mix everything in a bowl with spices, lemon juice, and a tablespoon of oil. Set aside to meld flavors for 10 minutes.
- Roll out the dough: Divide into 6-8 equal portions. Roll each into a thin circle about 15cm (6 inches) in diameter on a lightly floured surface, aiming for even thickness.
- Shape the samosas: Cut each circle in half to form two semi-circles. Moisten the straight edge with water, then spoon about two tablespoons of filling near the corner. Fold into a cone shape, sealing the edge securely with a pinch or press. Repeat for all pieces.
- Heat the oil: Fill your pan with enough oil to submerge the samosas (about 2-3 inches deep). Heat to 180°C (356°F). Test with a small piece of dough—if it sizzles immediately, it’s ready.
- Fry the samosas: Carefully lower a few at a time into hot oil. Fry for about 4-5 minutes, turning occasionally, until golden brown and crispy. Keep an eye on the color to avoid over-torquing. If they brown too quickly, reduce heat slightly.
- Drain and rest: Use a slotted spoon to transfer the fried samosas onto paper towels. Let them rest for 2 minutes to finish crisping up. Check for even coloring and a crackly exterior.
- Serve warm: Plate the samosas with a squeeze of lemon or your favorite chutney. They should be hot, crispy on the outside, and packed with flavorful, veggie-packed filling.
Allow fried samosas to rest briefly on paper towels. Serve immediately with lemon wedges or chutney for dipping. For best crunch, eat while hot.
How to Know It’s Done
- Samosas are golden and crispy with an even color.
- Filling is hot, fragrant, and holds together without leaking.
- Oil temperature remains steady around 180°C (356°F) for even frying.
Spring Vegetable Samosas
Ingredients
Equipment
Method
- Mix the flour and salt in a large bowl, then add the cold butter pieces. Use your fingers or a pastry cutter to incorporate the butter until the mixture resembles coarse crumbs.
- Gradually add the cold water, a tablespoon at a time, and knead gently until the dough comes together. Cover with plastic wrap and chill in the fridge for 20 minutes.
- While the dough rests, toast cumin seeds in a tablespoon of oil until fragrant, about 30 seconds, then add coriander powder and garam masala. Cook briefly, then set aside.
- In a mixing bowl, combine the diced roasted carrots, mashed potatoes, thawed peas, and chopped greens. Add the toasted spices and lemon juice, mixing well to evenly distribute the flavors.
- Divide the chilled dough into 6-8 equal portions. Roll each piece into a thin circle about 15cm (6 inches) in diameter on a lightly floured surface.
- Cut each circle in half to form two semi-circles. Moisten the straight edge with a little water, then place a spoonful of filling near the corner of each semi-circle.
- Fold the semi-circle into a cone shape, pressing the moist edge to seal completely and prevent filling from leaking during frying.
- Heat vegetable oil in a deep fryer or deep pan to 180°C (356°F). Carefully slide in a few samosas at a time, frying until golden brown and crispy, about 4-5 minutes, turning occasionally.
- Use a slotted spoon to remove the samosas from the oil, draining excess oil on paper towels. Let them rest for a couple of minutes to finish crisping up.
- Serve the hot, crispy samosas with lemon wedges or your favorite chutney, enjoying the vibrant flavors and satisfying crunch.
Notes
Top Tips for Perfect Samosas
- Bolded mini-head: Use a hot, but not smoking, oil temperature to achieve crispness without burning the exterior.
- Bolded mini-head: Keep dough cold when rolling to prevent sticking and tearing; refrigerate if necessary.
- Bolded mini-head: Seal edges thoroughly with water or egg wash to prevent filling from leaking during frying.
- Bolded mini-head: Fry in small batches to maintain oil temperature and ensure even cooking.
- Bolded mini-head: Rest fried samosas briefly on paper towels to drain excess oil and retain crunch.
- Bolded mini-head: Use a sharp knife for cutting and sealing to get clean edges and prevent tearing.
- Bolded mini-head: Add a pinch of salt to the dough for a subtle flavor boost that complements the spicy filling.
Common mistakes and how to fix them
- FORGOT to preheat oil: heat to 180°C (356°F) before frying; avoid undercooking or sogginess.
- DUMPED filling too early: let it rest 10 minutes for flavors to meld and moisture to reduce.
- OVER-TORCHED samosas: cook at steady heat, turn frequently, avoid high flame to prevent dark spots.
- SKIPPED sealing edges: moisten dough with water, pinch firmly to prevent filling leaks during frying.
Quick fixes and pantry swaps
- When oil shimmers, gently place samosas to prevent splatters and ensure even frying.
- When filling leaks, seal edges with a damp brush or your finger for a tidy fold.
- Splash cold water if dough feels too sticky; knead briefly to restore elasticity.
- Patch over burnt spots with fresh dough or drain immediately to stop overcooking.
- Shield delicate samosas from drafts to prevent sudden temperature drops during frying.
Prep, store, and reheat tips
- Prepare the filling a day in advance; keep covered in the fridge to let flavors meld and soften vegetables, enhancing taste and ease of assembly.
- Assemble samosas up to 24 hours ahead; store covered in the fridge to prevent drying out, but fry them within this window for optimal crispness and freshness.
- Refrigerated samosas stay good for about 1-2 days; for longer storage, freeze them tightly wrapped for up to a month, maintaining their texture.
- Reheat in a hot oven at 180°C (356°F) for 10-12 minutes until crispy and heated through, or briefly re-fry in hot oil for extra crunch and aroma—listen for that crackling sound.
FAQs about Vegetable Samosas
1. Can I use fresh peas instead of frozen?
Use frozen peas for convenience—they keep their bright color and sweetness. Thaw and drain well before mixing.
2. Should I cook fresh peas before adding?
Absolutely. Fresh peas will add a slightly firmer texture and a brighter flavor, especially if you blanch them briefly.
3. How do I know when the samosas are done?
Yes, lightly fry or bake the samosas until golden and crispy. They should be hot and crackling when served.
4. What’s the best way to test for doneness?
If the oil stops crackling and the samosas turn a deep, even golden, they’re ready. Check for crispy exterior and cooked filling.
5. Can I use olive oil for frying?
Use a neutral oil like sunflower or canola for frying. It heats evenly and has a high smoke point, avoiding burnt flavors.
6. Is olive oil suitable for frying samosas?
Olive oil can burn at high heat, so if you must, use light extra virgin at lower temp or switch to a neutral oil.
7. Can I bake instead of fry?
Yes, you can bake the samosas at 200°C (392°F) for about 20-25 minutes for a less oily version.
8. How does baking change the texture?
Baking gives a crisper exterior but may lose some of the traditional fried flavor and crunch.
9. How should I store leftovers?
Store cooked samosas in an airtight container at room temp for a few hours, or in the fridge for 1-2 days.
10. How do I reheat without losing crunch?
Reheat in a hot oven or skillet to restore crispness and warmth. Avoid microwave if you want crispy edges.
Making vegetable samosas is a nostalgic trip back to simpler flavors, but with a fresh, seasonal twist. It’s a way to gather around the table and share something warm, crispy, and full of vibrant vegetables. These little bites remind me how a humble snack can carry so much personality and history, depending on the season and the mood.
In the end, it’s about the joy of those crackling edges and the fragrant, spicy filling inside. Whether you’re serving them at a casual get-together or just craving a satisfying snack, these samosas hold a little bit of comfort in every crispy fold. It’s a messy process, but one worth every bite.

Hi, I’m James Whitmore, the creator behind Salt Evangelist. If there is one ingredient I believe deserves more respect, it is salt. Not because it makes food salty, but because it makes food come alive. Salt highlights sweetness, softens bitterness, sharpens acidity, and deepens savoriness. It is not just seasoning. It is transformation.

