Stuffing olives might seem like a small, almost trivial task, but for me, it’s become a quiet ritual in the chaos of cooking. There’s a soothing rhythm to gently pressing each olive open, filling it with a tiny burst of cheese, nuts, or herbs. It’s one of those moments where mindfulness sneaks in, turning a simple snack into a meditative act that slows down my busy kitchen routine.
These stuffed olives carry more than just flavor—they carry a sense of calm. In a world that feels perpetually rushed, I find this slow, tactile act helps me reconnect with the food and with myself. Plus, the burst of salty, creamy goodness from each bite makes all that careful stuffing worth it, especially when shared with friends or enjoyed solo as a mindful pause.
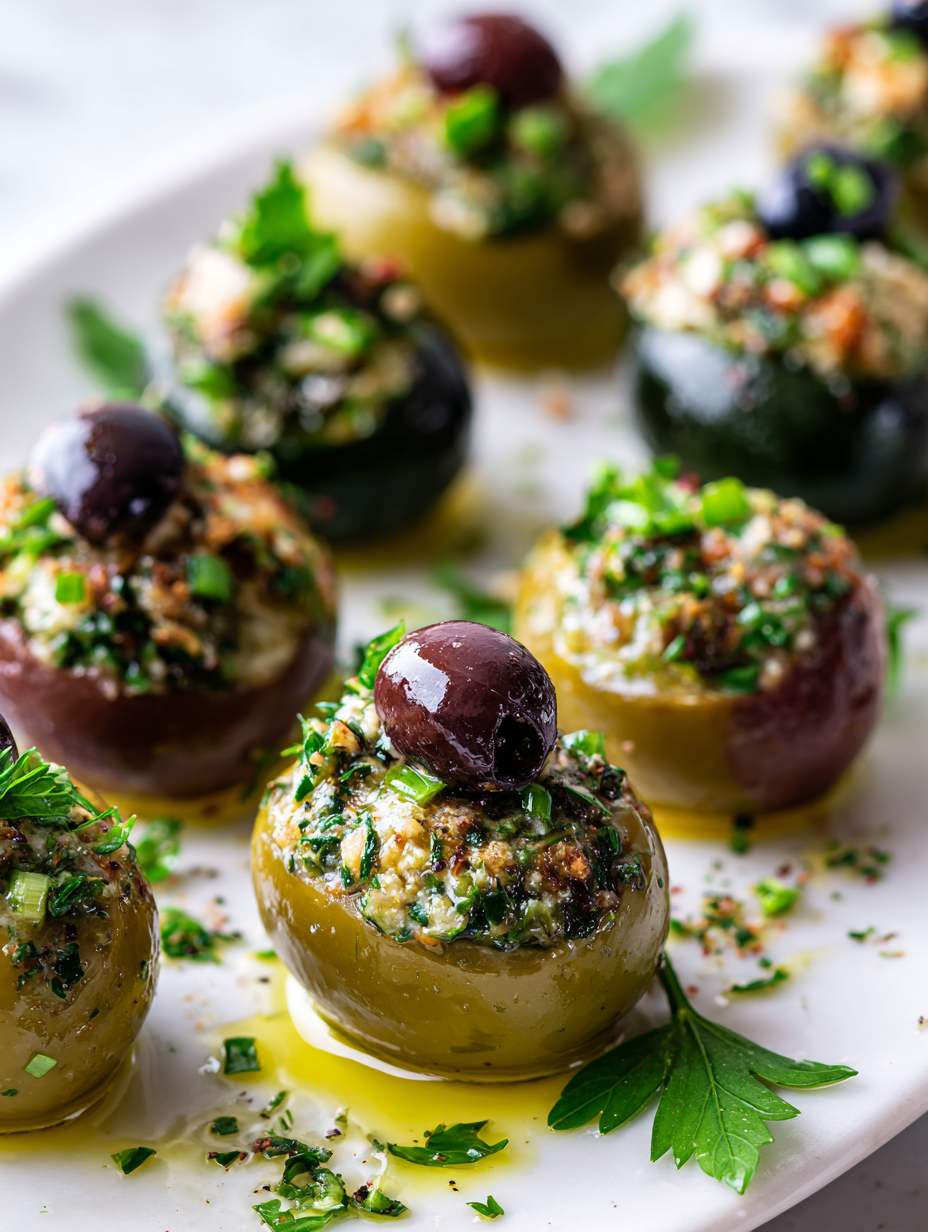
Focusing on the tiny act of stuffing olives as a meditative pause in busy kitchen moments, highlighting the tactile pleasure and slow rhythm that makes this simple snack a mindful ritual.
The mindful act of stuffing
- Sticking my fingers into each olive feels oddly comforting, like a small act of care amidst chaos.
- I used to rush through stuffing olives, but now I savor the slow rhythm, feeling more present.
- Sharing a plate of these stuffed olives always sparks quiet conversations and shared smiles.
- There’s a nostalgic joy in the simple act—reminds me of family gatherings around a messy, lively table.
The quiet ritual of stuffing
- I first stumbled upon stuffed olives during a trip to a small Mediterranean village, where a local chef handed me a tiny plate of them with a wink. That moment made me realize how much joy can come from something so small and simple—just a few olives, a little cheese, and a slow hand. It’s become a ritual to me, a way to slow down and enjoy a tiny, tactile task that feels almost meditative.
- Over the years, I’ve experimented with different fillings, but the core idea remains the same: a quiet act of care and patience. Filling each olive feels like a tiny conversation with my own hands, a moment to focus on something tactile amid the rush of kitchen chaos. When I share these with friends, it’s always a reminder to savor the small pleasures, to pause and appreciate the slow moments.
- heading: The quiet ritual of stuffing
Origins and Surprising Facts
- Stuffed olives have roots in Mediterranean coastal villages, where preserving olives with fillings became a local tradition.
- Historically, filling olives with herbs or cheese was a clever way to enhance their flavor and preserve them longer.
- In some cultures, stuffed olives were considered a symbol of hospitality, served during festive gatherings or as a sign of welcoming guests.
Key ingredients at a glance
- Green olives: I love the briny burst they give, but you can swap for kalamata if you prefer a deeper, smoky flavor—just watch out for their softer texture.
- Cream cheese: It’s my go-to for stuffing because it’s creamy and easy to pipe, but sour cream works in a pinch for a tangier bite—just keep it chilled.
- Nuts (almonds or pistachios): I toast them lightly first for crunch and aroma; skip if you want a softer filling or are nut-allergic, but the crunch really makes it pop.
- Herbs (parsley, basil): Fresh herbs brighten the filling with a lively, herbaceous punch; dried herbs can work, but they’re less vibrant and more subdued.
- Lemon zest: Adds a zesty, bright note that cuts through the richness. Skip if you prefer a milder, more mellow flavor, but don’t forget to zest before juicing.
- Filling size: I stuff just enough to peek out of the olive—going over makes it messy to stuff, but under-stuffed feels a bit empty—find your balance.
- Olive brine: A splash of brine in the filling makes it more flavorful and juicy; if you want less salt, rinse the olives briefly but keep a little for flavor.
Spotlight on key ingredients
Green olives:
- I love their briny, punchy flavor and firm texture that holds up well when stuffed. Rinsing them briefly can tone down the salt if needed.
- Cream cheese: It’s smooth and mild, making it perfect for piping. When chilled, it firms up nicely, but at room temp, it softens and spreads easily.
Herbs and Nuts:
- Herbs (parsley, basil): Fresh herbs add a lively, aromatic brightness that cuts through the richness. Snip them finely to distribute evenly.
- Nuts (almonds, pistachios): Toasted nuts bring a satisfying crunch and a nutty aroma that complements the salty olives. Keep them lightly toasted for best flavor.
Notes for ingredient swaps
- Cheese options: Feta or goat cheese can replace cream cheese for a tangy, crumbly bite—adjust the filling texture accordingly.
- Olive varieties: Use kalamata or castelvetrano olives instead of green for a richer, more complex flavor—watch their softer texture.
- Nuts: Swap almonds for pistachios or walnuts for different crunch and flavor; toast them lightly to bring out aroma.
- Herbs: Fresh thyme or oregano can substitute parsley or basil, adding different aromatic notes—use sparingly for balanced flavor.
- Citrus zest: Lime or orange zest can replace lemon for a sweeter or more floral brightness—adjust quantity to avoid overpowering.
- Filling binder: Greek yogurt or sour cream can replace cream cheese for a lighter, tangier filling—keep chilled for best texture.
- Brine: A splash of white wine or sherry vinegar in the filling adds acidity and depth—use sparingly to avoid excess saltiness.
Equipment & Tools
- Small sharp knife: To pit and slit olives cleanly.
- Piping bag or small spoon: To accurately fill olives without mess.
- Plate or tray: To hold and serve the stuffed olives.
- Mixing bowl: To prepare and chill the filling.
Step-by-step guide to stuffed olives
- Gather all your equipment: a small sharp knife, a piping bag or a small spoon, a plate for stuffed olives, and a small bowl for mixing. This makes assembly smoother.
- Prepare your filling first: in a bowl, mix softened cream cheese with chopped herbs, lemon zest, and a pinch of salt. Chill for 10 minutes to firm up slightly.
- Carefully pit each olive using the small knife. Make a gentle slit lengthwise, avoiding tearing the skin; the goal is a clean pocket.
- Using the piping bag or a small spoon, fill each olive with about 1 teaspoon of the chilled filling. If using a spoon, press gently to avoid breaking the olive skin.
- For a more uniform look, you can tap the filled olives lightly on the plate to settle the filling. Wipe any drips with a paper towel.
- Once all olives are stuffed, arrange them on a serving platter. Drizzle with a little olive brine or extra herbs for a fresh touch. Serve immediately or refrigerate for up to 2 hours.
- If refrigerating, cover loosely with plastic wrap. Let come to room temperature for 10 minutes before serving to enhance flavor and aroma.
- Finish with a sprinkle of chopped herbs or a twist of lemon zest for visual appeal and added brightness.
Serve immediately for best texture. If preparing ahead, cover loosely and refrigerate up to 2 hours. Let olives sit at room temperature for 10 minutes before serving to bring out their aroma and flavor.
How to Know It’s Done
- Olives are evenly filled, with no bursting or tearing of skin.
- Filling is firm but not overflowing, with a smooth, creamy texture.
- Olives look plump and glossy, with fresh herb specks visible on top.
Mediterranean Stuffed Olives
Ingredients
Equipment
Method
- Gather your ingredients: pitted green olives, softened cream cheese, chopped fresh herbs, lemon zest, and toasted nuts. Prepare your piping bag or small spoon for filling.
- In a mixing bowl, combine the softened cream cheese with chopped herbs, lemon zest, and a pinch of salt if desired. Mix until smooth and well integrated. Chill the mixture for about 10 minutes to help it firm up.
- Carefully hold each olive and insert the small sharp knife to make a slit lengthwise, creating a gentle pocket without tearing the skin. Repeat for all olives.
- Fill each olive with about a teaspoon of the chilled cheese mixture using a piping bag or small spoon. Gently press the filling in to avoid bursting the olive skin.
- Place the stuffed olives on a plate or tray, arranging them in an even layer. Optionally, drizzle with a little olive brine or sprinkle with extra herbs for added flavor and visual appeal.
- Refrigerate the stuffed olives for up to 2 hours if not serving immediately. Before serving, let them sit at room temperature for 10 minutes to enhance aroma and flavor.
- Finish by sprinkling chopped toasted nuts or additional herbs on top for a pop of texture and color. Serve and enjoy these calming, flavorful bites.
Notes
Pro tips for stuffed olives
- Use a small, sharp knife to pit olives cleanly, avoiding tearing the skin.
- Chill your filling for at least 10 minutes; it firms up and pipes more neatly.
- When stuffing, gently press the filling in with a small spoon or piping bag for even distribution.
- Toast nuts lightly before chopping; it enhances aroma and crunch, making the filling more flavorful.
- Wipe any drips or spills on the olives with a damp towel before serving to keep presentation tidy.
- Let the stuffed olives sit at room temperature for 10 minutes before serving to boost aroma and flavor.
- If olives are too salty, rinse briefly under cold water and pat dry before stuffing.
Common mistakes and how to fix them
- FORGOT to drain olives → Rinse briefly to reduce saltiness.
- DUMPED filling too quickly → Slow, gentle pipe to avoid bursting the skin.
- OVER-TORCHED nuts → Toast nuts on low heat until golden and fragrant.
- MISSED the chill step → Always chill filling for better consistency and handling.
Quick fixes and pantry swaps
- When olives are too salty, splash with cold water and pat dry before stuffing.
- If filling is too soft, refrigerate for 10 minutes to firm up quickly.
- Splash a little olive brine on the filling for extra flavor and juiciness.
- Patch torn olive skins with a tiny dab of extra filling to seal gaps.
- Shield delicate stuffed olives from crushing by stacking gently in the fridge.
Prep, store, and reheat tips
- Prepare the filling and chill it in the fridge for up to 24 hours to enhance flavor and firmness.
- Stuff the olives a few hours ahead, then keep them covered in the refrigerator for up to 2 days; the flavors will meld nicely.
- Store stuffed olives in an airtight container, making sure they’re not compressed to prevent skin damage.
- Reheat if needed by letting them come to room temperature; they’re best served slightly chilled or at room temp, with a subtle aroma of herbs and brine.
- For optimal freshness, consume within 48 hours; after that, the texture might soften, and flavors diminish subtly.
Top questions about stuffed olives
1. What type of olives work best?
Choose firm, briny olives like Castelvetrano or green Manzanilla for best stuffing results. Rinse briefly if too salty, then dry thoroughly before filling.
2. What’s the ideal filling for stuffed olives?
Use softened cream cheese or feta for easy piping. Chill the filling for 10 minutes so it firms up and pipes neatly.
3. How do I pit olives without tearing them?
Pit the olives carefully with a small, sharp knife, making a slit lengthwise without tearing the skin for a clean pocket.
4. How much filling should I use?
Stuff each olive gently with a teaspoon of filling, pressing softly to avoid bursting the skin. Chill before serving to set the filling.
5. Can I customize the filling?
Add toasted nuts or chopped herbs to the filling for extra crunch and aroma. Light toasting enhances their flavor without burning.
6. How long can I store stuffed olives?
Serve immediately or refrigerate for up to 2 days. Let olives sit at room temp for 10 minutes before serving to rekindle aroma.
7. What if my filling is too soft or salty?
If filling is too soft, refrigerate for 10 minutes to firm up. If olives are too salty, rinse briefly under cold water before stuffing.
8. How do I fill the olives neatly?
Use a piping bag or small spoon for neat, even filling. Wipe any drips off the olives with a damp cloth before serving.
9. What if the olives break while stuffing?
If the olives burst or tear during stuffing, refrigerate briefly to firm the filling or replace with softer, pre-chilled filling.
10. Can I add extra liquid to the filling?
A splash of olive brine in the filling boosts flavor and juiciness. Adjust salt levels accordingly to keep the balance.
These stuffed olives are more than just a snack; they’re a mindful moment in a busy day, a tiny act of care that pays off with bursts of flavor and texture. Making them feels like a quiet meditation, where each olive gets a personal touch that’s satisfying to both the hands and the palate.
In a season of quick fixes and rushed meals, taking the time to stuff olives reminds me of the beauty in slow, deliberate kitchen acts. Sharing a plate of these can turn a simple gathering into a moment of quiet connection, with the salty, creamy crunch stealing the show.

Hi, I’m James Whitmore, the creator behind Salt Evangelist. If there is one ingredient I believe deserves more respect, it is salt. Not because it makes food salty, but because it makes food come alive. Salt highlights sweetness, softens bitterness, sharpens acidity, and deepens savoriness. It is not just seasoning. It is transformation.

