
Making mini spring rolls as a weekday snack feels like a small act of rebellion against the rush. They’re portable, quick to assemble, and you can pack them with whatever leftovers or veggies you have lying around. It’s surprising how a handful of fresh ingredients can turn into something so satisfying with just a little rolling and crunch.
I love that these tiny bites aren’t just for kids—adults find them just as addictive. They’re perfect for a quick lunch, a picnic, or even a lazy afternoon snack. Plus, customizing fillings means you can switch flavors easily, keeping things interesting no matter how many times you make them. It’s a kind of small, manageable joy for busy days.
Focusing on making mini spring rolls as a practical snack for busy weekday lunches, emphasizing their portability, quick assembly, and customizable fillings for different tastes.
Small Bites, Big Flexibility
- I love how these tiny rolls pack a punch of freshness, especially when I add a squeeze of lime at the end.
- There’s a quiet satisfaction in rolling each one; it’s almost meditative after a hectic day.
- Seeing kids happily munch on these makes me proud—they’re a sneaky way to get veggies into little mouths.
- I’ve wrecked a batch more times than I can count trying to get the perfect crispy edge—still worth the effort.
- Whenever I make these, I remember summer days at the Asian market, smelling garlic and cilantro in the air.
The story behind this recipe
- This recipe was born out of a lazy weekend afternoon when I had a bunch of odds and ends in the fridge—some cooked chicken, leftover veggies, and a pack of rice paper that was just waiting to be used. I wanted something small, portable, and fast to put together for a snack that wouldn’t make me feel sluggish afterward.
- There’s something satisfying about wrapping up a handful of ingredients into a neat little bundle—like tiny parcels of flavor—and knowing I can customize them based on what’s in season or what’s leftover. Plus, I remember how my kids loved helping me roll these; it’s a simple act that sparks joy and makes everyone feel involved.
- heading: Small Bites, Big Flexibility
Historical & Cultural Insights
- Mini spring rolls trace their roots to Vietnam, where they’re known as ‘cha gio’—crispy, savory parcels enjoyed for centuries.
- These tiny bites likely evolved as street food, portable and easy to eat on the go, blending fresh herbs with crunchy wrappers.
- The concept of miniaturizing traditional spring rolls gained popularity in Western cafes, turning them into chic, snackable appetizers.
- In many Asian cultures, making small rolls is a way to showcase fresh ingredients—each bite bursting with flavor and texture.
Key Ingredients Insights
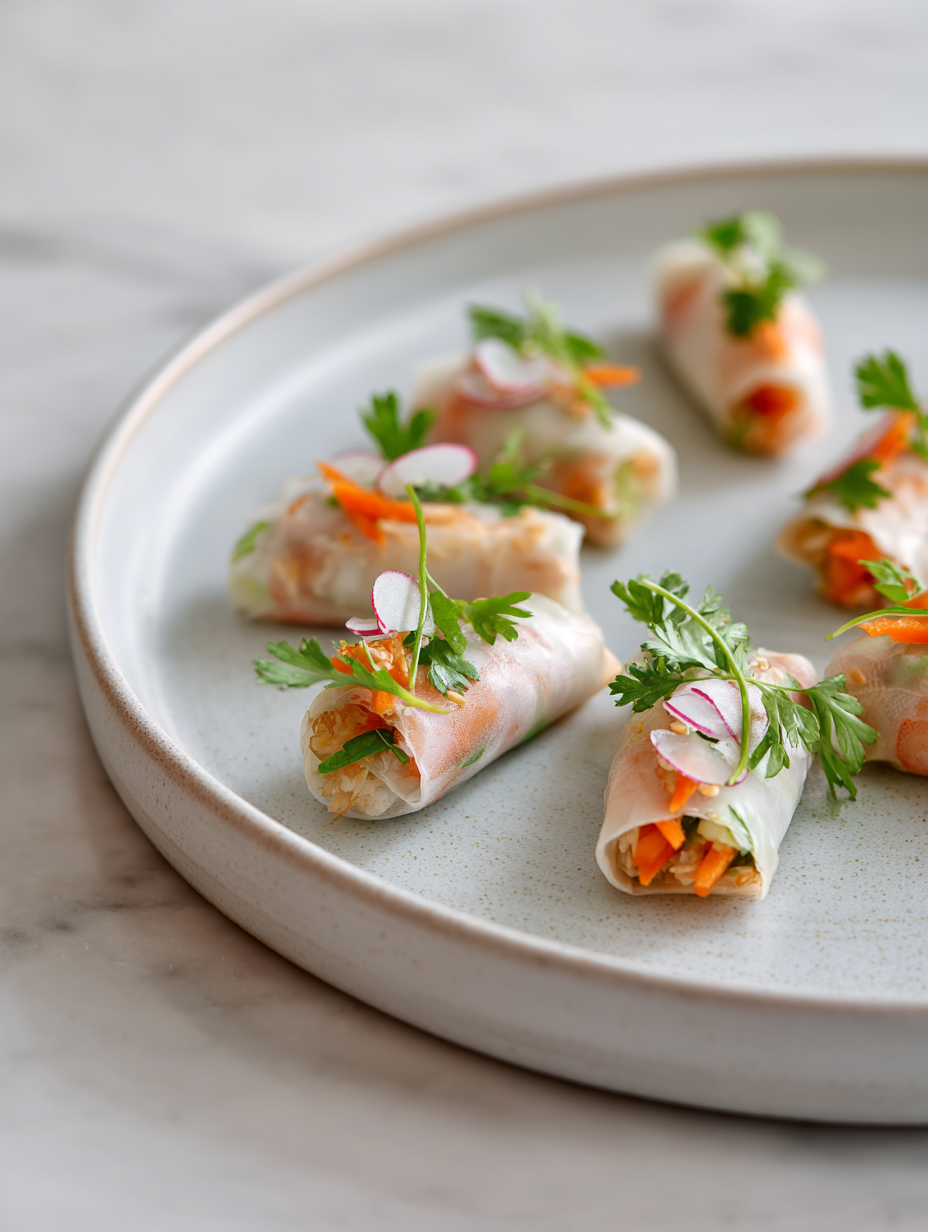
- Rice paper: I love how it’s almost translucent when soaked, giving each roll a delicate crunch. If it’s too sticky or tearing, try a quick dip in warm water until just soft—no more, or it gets soggy.
- Carrots: They add a sweet, crisp bite and a vibrant orange pop. Grate them finely so they roll smoothly; if too thick, the filling gets bulky and hard to seal.
- Cooked chicken: I prefer shredded, leftover roasted chicken for its smoky flavor. Swap with cooked shrimp or tofu if you want a vegetarian twist—just make sure it’s firm and well-drained.
- Herbs: Fresh cilantro and mint make these pop with brightness. If you’re sensitive to cilantro, swap with basil or parsley for a different herbal zing—less chaos, more calm.
- Dipping sauce: I usually go for a tangy soy-sesame mix, but a splash of lime juice brightens everything. For a creamier option, add a touch of peanut butter—rich and nutty, with a smoky undertone.
- Vegetables: Bell peppers or shredded cabbage add crunch and color. Use what’s fresh—if they’re a bit limp, give them a quick rinse and pat dry before adding.
- Oil for frying: If you prefer baked, skip the oil. For deep-frying, I use vegetable oil heated to 180°C (350°F). Keep an eye on the crackling—golden and crispy is perfect, but burnt is a quick fix.
Spotlight on key ingredients
Rice paper:
- I love how it’s almost translucent when soaked, giving each roll a delicate crunch. If it’s too sticky or tearing, try a quick dip in warm water until just soft—no more, or it gets soggy.
- Carrots: They add a sweet, crisp bite and a vibrant orange pop. Grate them finely so they roll smoothly; if too thick, the filling gets bulky and hard to seal.
Herbs & Protein:
- Herbs: Fresh cilantro and mint make these pop with brightness. If you’re sensitive to cilantro, swap with basil or parsley for a different herbal zing—less chaos, more calm.
- Cooked chicken: I prefer shredded, leftover roasted chicken for its smoky flavor. Swap with cooked shrimp or tofu if you want a vegetarian twist—just make sure it’s firm and well-drained.
Notes for ingredient swaps
- Rice paper: I love how it’s almost translucent when soaked, giving each roll a delicate crunch. If it’s too sticky or tearing, try a quick dip in warm water until just soft—no more, or it gets soggy.
- Carrots: They add a sweet, crisp bite and a vibrant orange pop. Grate them finely so they roll smoothly; if too thick, the filling gets bulky and hard to seal.
- Cooked chicken: I prefer shredded, leftover roasted chicken for its smoky flavor. Swap with cooked shrimp or tofu if you want a vegetarian twist—just make sure it’s firm and well-drained.
- Herbs: Fresh cilantro and mint make these pop with brightness. If you’re sensitive to cilantro, swap with basil or parsley for a different herbal zing—less chaos, more calm.
- Dipping sauce: I usually go for a tangy soy-sesame mix, but a splash of lime juice brightens everything. For a creamier option, add a touch of peanut butter—rich and nutty, with a smoky undertone.
- Vegetables: Bell peppers or shredded cabbage add crunch and color. Use what’s fresh—if they’re a bit limp, give them a quick rinse and pat dry before adding.
- Oil for frying: If you prefer baked, skip the oil. For deep-frying, I use vegetable oil heated to 180°C (350°F). Keep an eye on the crackling—golden and crispy is perfect, but burnt is a quick fix.
Equipment & Tools
- Deep frying pan: For frying the spring rolls to crispy perfection.
- Bowl of warm water: To soften the rice paper for rolling.
- Slotted spoon or tongs: To handle hot rolls safely during frying.
- Paper towels: To drain excess oil after frying.
- Cutting board and sharp knife: For prepping fillings and cutting ingredients.
Step-by-step guide to mini spring rolls
- Gather all your ingredients and tools before starting—mise en place is your friend here.
- Soak one rice paper in warm water (about 30°C / 86°F) for 10-15 seconds until pliable but not mushy. Lay flat on a clean surface.
- Place a small amount of filling (about 1 tablespoon) near the bottom of the rice paper—filling can be cooked chicken, shredded tofu, or leftover veggies.
- Fold the bottom over the filling, then fold in the sides, and roll tightly from bottom to top, sealing the edge with a dab of water if necessary.
- Repeat with remaining rice papers and fillings. Keep completed rolls covered with a damp cloth to prevent drying out.
- Heat a small amount of oil (about 2-3 cm depth) in a frying pan over medium heat (around 180°C / 350°F).
- Fry the mini spring rolls in batches, turning occasionally, until golden brown and crispy—about 2-3 minutes per batch.
- Check for even color and crispness; they should shimmer with a golden hue and emit a fragrant, toasted smell.
- Remove from oil and drain on paper towels. Let sit for 1-2 minutes to crisp up further.
- Serve immediately with your favorite dipping sauce—soy-sesame, peanut, or a squeeze of lime.
Let the fried rolls rest on paper towels for a minute. Serve immediately with dipping sauces or arrange on a platter. They’re best enjoyed warm and crispy, with a satisfying crunch in every bite.
How to Know It’s Done
- Rice paper is translucent and flexible without tearing.
- Filling is evenly distributed and sealed tightly.
- Spring rolls are golden and crispy, emitting a toasted aroma.
Mini Spring Rolls
Ingredients
Equipment
Method
- Arrange all your ingredients and tools nearby to make the process smooth and enjoyable.
- Fill a shallow bowl with warm water (around 30°C / 86°F). Dip one rice paper sheet into the water for about 10-15 seconds until it becomes soft and pliable, then carefully lay it flat on a clean surface.
- Place about a tablespoon of shredded cooked chicken, grated carrots, chopped cilantro, and mint near the bottom edge of the rice paper, leaving some space at the sides.
- Fold the bottom edge of the rice paper over the filling, pressing gently to enclose it.
- Fold in the sides of the rice paper toward the center, keeping the filling snug inside.
- Roll the parcel tightly from the bottom to the top, sealing the edge with a light dab of water if necessary to secure it.
- Repeat the soaking and rolling process with the remaining rice papers and filling ingredients, keeping finished rolls covered with a damp cloth to prevent drying out.
- Heat about 2-3 cm of vegetable oil in a deep frying pan over medium heat until it reaches about 180°C (350°F). To check, dip a small piece of rice paper—if it sizzles and turns golden in seconds, the oil is ready.
- Carefully place the assembled spring rolls into the hot oil, frying in batches to avoid overcrowding. Fry for 2-3 minutes, turning occasionally, until they turn golden brown and crispy.
- Use a slotted spoon or tongs to remove the rolls from the oil, letting excess oil drain off onto paper towels. Rest for a minute to crisp up further.
- Serve the mini spring rolls immediately with a dipping sauce made from soy sauce or your favorite condiment for an extra burst of flavor.
Notes
Pro Tips for Perfect Mini Spring Rolls
- Soak rice paper briefly in warm water until just pliable—avoid over-soaking to prevent tearing.
- Keep fillings compact and not overstuffed—this makes rolling easier and prevents leaks.
- Fry in oil heated to 180°C (350°F)—maintain medium heat to ensure even crispness without burning.
- Seal edges with a dab of water—this keeps the rolls tightly closed during frying or steaming.
- Rest fried rolls on paper towels briefly—this drains excess oil and keeps the exterior crispy.
- Use fresh herbs—cilantro and mint brighten flavors; add just before serving for maximum impact.
- For a healthier option, bake at 200°C (390°F) until golden—watch for even coloring and avoid dryness.
Common mistakes and how to fix them
- FORGOT to dry rice paper thoroughly → causing tearing, dry slightly longer or use a damp cloth.
- DUMPED filling in too much → overstuffed rolls burst; use smaller portions for better sealing.
- OVER-TORCHED oil → burns quickly, causing bitter taste; maintain medium heat and watch carefully.
- FAILED to seal edges properly → filling leaks out; dab water on edges to secure tightly before rolling.
Quick Fixes for Common Issues
- When rolls crackle loudly, check oil temperature—lower heat slightly, around 170°C (338°F).
- Splash a bit of water on dry rice paper to rehydrate and prevent tearing during rolling.
- Patch over any torn rice paper with a tiny dab of water before continuing to roll.
- DUMPED filling out too early? Use a spoon to adjust and reseal quickly with a dab of water.
- Shield burnt oil by removing from heat immediately and replacing with fresh oil for clean flavor.
Prep, store, and reheat tips
- Prepare fillings and chop herbs a day in advance; keep refrigerated to save time and keep flavors fresh.
- Soak rice papers just before assembling to prevent drying out; store unused in a sealed container for up to 24 hours.
- Fried spring rolls are best eaten within 2 hours; reheat in a 180°C (350°F) oven until crispy, about 5 minutes, for that fresh crunch.
- Store leftovers in an airtight container in the fridge for up to 24 hours; reheating will soften the shell, so crisp in the oven if desired.
- Avoid freezing cooked rolls as the texture suffers; best enjoyed fresh or within a day for optimal crunch and flavor.
Top questions about mini spring rolls
1. How do I soften rice paper without tearing?
Use warm water (about 30°C / 86°F) to soak the rice paper for 10-15 seconds until it’s soft but not soggy. It should be pliable and transparent, not tearing or sticky.
2. How much filling should I use per roll?
Place about a tablespoon of filling near the bottom of the rice paper, fold the bottom over, then fold in the sides and roll tightly, sealing with a dab of water if needed.
3. How do I know when the spring rolls are crispy enough?
Fry the rolls in oil heated to 180°C (350°F). Turn occasionally until golden and crispy, about 2-3 minutes. Look for a shimmering, golden hue and a toasted aroma.
4. Can I make these ahead and reheat later?
You can store assembled but unfried rolls covered in a damp cloth in the fridge for up to 24 hours. For best flavor, fry them fresh. Reheat fried rolls in a 180°C (350°F) oven for 5 minutes until crispy.
5. What if my rolls crackle or burn during frying?
If the oil starts to smoke or burn, remove the pan from heat immediately and replace the oil. Keep the heat at medium to avoid burning the rolls. If rolls crackle loudly, check the oil temperature—reduce slightly if needed.
6. How do I prevent the rolls from bursting open?
Keep fillings compact and not overstuffed to prevent bursting. Seal edges with a dab of water before rolling. Use fresh herbs just before serving for maximum brightness.
7. What’s the best way to handle hot, fried rolls?
Use a slotted spoon or tongs to handle hot rolls safely. For even frying, don’t overcrowd the pan. Maintain oil temperature and turn rolls occasionally for even color.
8. Can I bake these instead of frying?
For a healthier version, bake at 200°C (390°F) until golden, about 10-12 minutes, flipping halfway. Keep an eye on color to avoid drying out or burning.
9. Can I customize the fillings?
Use leftovers like cooked chicken, shrimp, or tofu. Fresh herbs like basil or parsley can replace cilantro or mint if you prefer milder flavors or have sensitivities.
10. What if my rice paper tears while rolling?
If the rice paper tears easily, dip it briefly in warm water again and work quickly. Use a damp cloth to keep unused papers moist and flexible.
These mini spring rolls are more than just a snack; they’re a quick way to bring fresh, vibrant flavors into busy days. The crispy edges and zesty fillings make every bite feel like a tiny celebration of simple ingredients.
Whenever I make these, I’m reminded that good food doesn’t need to be complicated. They’re flexible, forgiving, and always satisfying—perfect for when you want something homemade without fuss. Just a little rolling and frying, and suddenly, lunch feels a bit more special.