
Chicken tenders seem simple, but getting that perfect crispy coating while keeping the meat tender inside is an art. It’s all in the breading technique—how you season, flour, and fry can make or break the bite. I’ve spent countless afternoons experimenting, trying to perfect that balance of crunch and juiciness.
What I’ve learned is that patience and a little chaos in the kitchen actually help. Dipping, coating, double-breading—each step matters. When it all comes together, you get tenders that are just as satisfying as the first bite, with a crackly crust that holds in all that juicy chicken. It’s a process worth mastering, especially when you crave that homemade crunch.
Focusing on the overlooked importance of the breading technique to achieve ultra-crispy chicken tenders that stay tender inside, blending a bit of chaos and patience in the kitchen.
The secret chaos of crispy breading
- Crispy breading has always felt like a small victory, especially when it stays intact through bites.
- I love how the smell of frying chicken instantly brings back childhood weekends in my family’s kitchen.
- There’s a quiet pride in perfecting a simple recipe that everyone asks for again and again.
- Sometimes chaos in the kitchen leads to the best surprises—like discovering an extra crispy crust by accident.
The messy joy of crispy chicken
- This recipe came from a backyard experiment on a lazy summer afternoon. I was tired of the same old chicken tenders, craving something with a little more crunch and soul. I started thinking about the chaos of frying, the way oil crackles and scents fill the air, and how that moment of crisping can turn a simple piece of chicken into something special.
- Over the years, I’ve tweaked my breading technique, trying to lock in that tender inside and ultra-crispy outside. It’s messy, it’s loud, but when it all comes together—hot, crunchy, and juicy—it’s pure satisfaction. This isn’t just about a snack; it’s a little act of kitchen rebellion, a reminder that a simple dish can still surprise and delight.
- heading: ‘The messy joy of crispy chicken’
Trivia and history of chicken tenders
- Chicken tenders as we know them gained popularity in American diners in the mid-20th century, quickly becoming a fast-food staple.
- The term ‘tender’ emphasizes the soft, succulent nature of the chicken meat, a contrast to older, tougher cooking styles.
- Originally, breaded chicken pieces were a way to stretch cheaper cuts of chicken, making them more appealing and filling.
- In many cultures, breaded fried chicken has roots that trace back to ancient techniques of coating and frying meat for preservation and flavor.
- Modern crispy tenders owe much to the invention of commercial breading mixes, which made home frying more accessible and consistent.
Key ingredients and tips
- Chicken breasts: I prefer skinless, boneless breasts—they’re lean and tender, but you can use thighs for extra juiciness if you like. Just watch the cooking time, as thighs can be a bit more forgiving.
- Flour: I use all-purpose flour for the coating—it’s got that reliable, neutral crunch. For gluten-free, try rice flour or cornstarch, which give a lighter, crispier bite.
- Egg wash: Whisked eggs help the breading stick and stay crispy. If you’re out, a splash of buttermilk works well—adds a tang that’s bright and a little richer.
- Breadcrumbs: I like panko for extra crunch—those flakes are big, airy, and stay crispy longer. For a different texture, crushed cornflakes are surprisingly good and add a sweet crunch.
- Seasonings: Salt, pepper, paprika, and garlic powder make the flavor pop. I sometimes toss in a pinch of cayenne for a smoky heat—just enough to tingle the palate, not burn.
- Oil: Use a neutral oil with a high smoke point like vegetable or canola. Keep it at 175°C/350°F, so the tenders fry evenly and don’t soak up too much oil—crisp and not greasy.
- Optional: A splash of lemon juice or hot sauce in the batter can brighten the flavor and add a subtle zing—think of it as a little kitchen secret.
Spotlight on key ingredients
Chicken breasts:
- I prefer skinless, boneless breasts—they’re lean and tender, but you can use thighs for extra juiciness if you like. Just watch the cooking time, as thighs can be a bit more forgiving.
- Flour: I use all-purpose flour for the coating—it’s got that reliable, neutral crunch. For gluten-free, try rice flour or cornstarch, which give a lighter, crispier bite.
- Breadcrumbs: I like panko for extra crunch—those flakes are big, airy, and stay crispy longer. For a different texture, crushed cornflakes are surprisingly good and add a sweet crunch.
Breadcrumbs:
- Panko breadcrumbs: Light, airy, and big flakes—these stay crispy longer and give a satisfying crunch that’s hard to beat. They seem to soak up less oil, keeping the tenders lighter.
- Egg wash: It’s the glue that holds everything together. When it’s just right—thick enough to coat evenly but not so runny—it creates a smooth, shiny layer that crisps up beautifully during frying.
Notes for ingredient swaps
- Dairy-Free: Use almond milk or coconut milk instead of eggs—will affect binding slightly, but still tasty.
- Gluten-Free: Swap all-purpose flour with rice flour or cornstarch—crispiness remains, but texture is lighter.
- Low-Sodium: Choose unsalted breadcrumbs and reduce added salt—flavor will be milder, so season to taste.
- Spicy Kick: Add cayenne or hot paprika to breadcrumbs—gives a smoky heat without overpowering the chicken.
- Herb Variations: Mix dried herbs like thyme or oregano into the breadcrumb coating—adds a fragrant, earthy note.
- Oil Choice: Use avocado or sunflower oil for higher smoke points—keeps tenders crispy without burning.
- Lemon Bright: Incorporate lemon zest into the breadcrumb mix—brightens flavor with a fresh, zesty aroma.
Equipment & Tools
- Heavy skillet or deep-fryer: For even heat and crispy frying.
- Thermometer: To monitor oil temperature accurately.
- Tongs: Handle hot chicken strips carefully.
- Shallow dishes: Organize breading stations for dipping.
- Wire rack: Drain excess oil and keep tenders crispy.
Step-by-step guide to crispy tenders
- Equipment & Tools: Gather a heavy-bottomed skillet or deep-fryer, a thermometer, tongs, a shallow dish for flour, a bowl for eggs, and a wire rack for draining.
- Slice chicken breasts into strips about 1 inch wide. Pat dry with paper towels—damp chicken won’t cling to breading.
- Set up your breading station: flour in one dish, beaten eggs in another, panko breadcrumbs mixed with seasonings in the third.
- Dip each chicken strip into flour, ensuring all sides are coated. Shake off excess—uniform dryness helps the batter stick.
- Next, dunk into the egg wash, fully coating the piece. Let excess drip off to avoid sogginess.
- Coat in panko mixture, pressing gently to adhere evenly. Repeat with all strips—double-breading makes for extra crunch.
- Heat oil in your skillet or deep fryer to 175°C/350°F. Use the thermometer for accuracy—oil should shimmer but not smoke.
- Carefully add tenders, 3-4 at a time, to avoid overcrowding. Fry for about 4–5 minutes, turning occasionally, until golden and crispy.
- Check for doneness: tenders should be golden-brown, the meat white and firm inside, with a crackly crust.
- Remove tenders with tongs, drain on the wire rack or paper towels. Rest for 2 minutes to settle the juices and crisp up further.
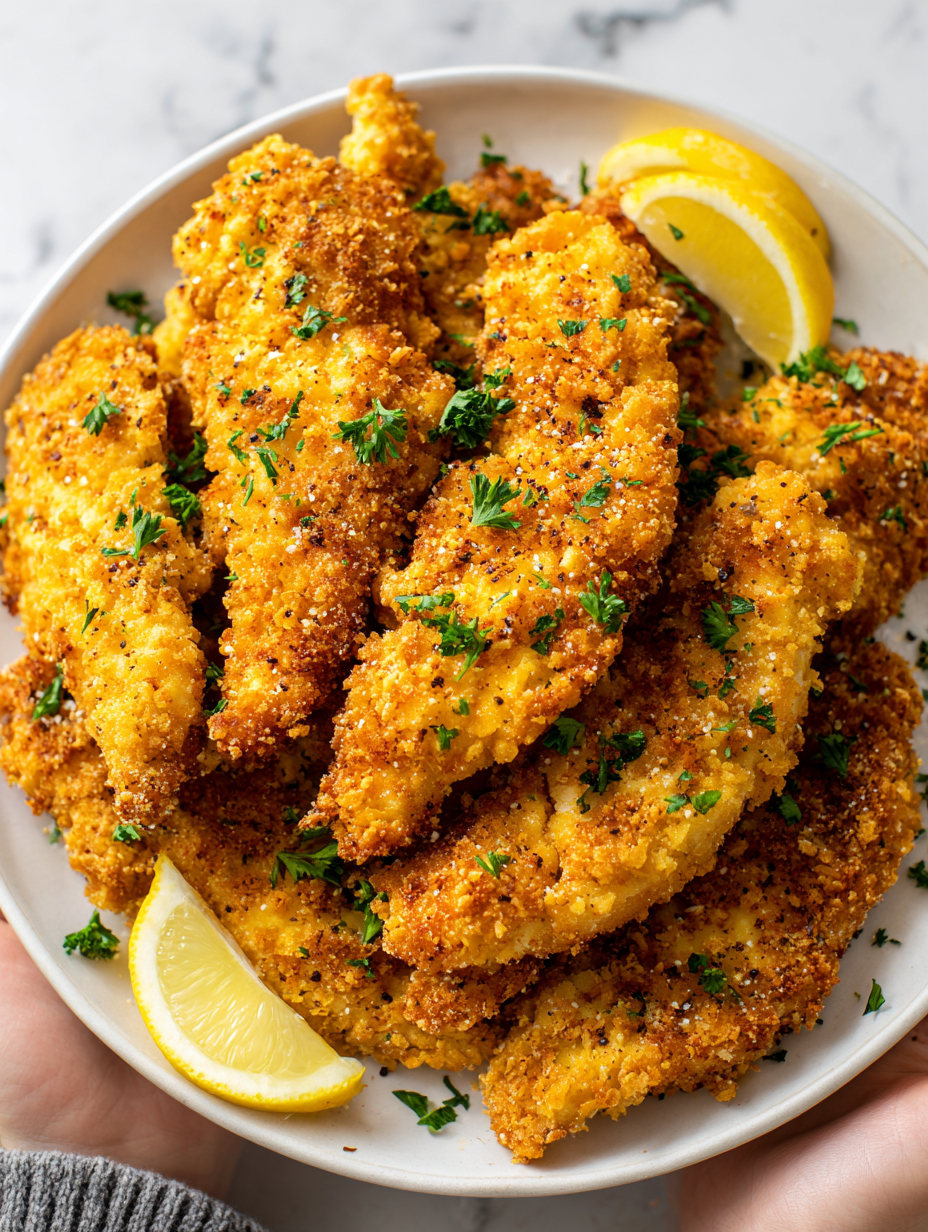
- Serve hot, with your favorite dips. The exterior should be crackly, and the inside juicy—perfect bite every time.
Let the tenders rest on a wire rack for 2 minutes. Serve immediately for maximum crunch and juiciness.
How to Know It’s Done
- Crust is golden and crispy, not pale or soggy.
- Internal temperature reaches 75°C/165°F for safety.
- Chicken meat is opaque and tender inside, with no pink.
Crispy Homemade Chicken Tenders
Ingredients
Equipment
Method
- Gather all your ingredients and set up a breading station: place flour in a shallow dish, beaten eggs in a second dish, and season the panko breadcrumbs mixed with paprika, garlic powder, salt, and pepper in a third dish.
- Pat the chicken strips dry with paper towels to remove excess moisture, which helps the breading stick evenly and crisps up nicely during frying.
- Dip each chicken strip into the flour, turning to coat all sides evenly, then gently shake off any excess flour. This initial coating helps the egg adhere better.
- Next, submerge the floured chicken into the beaten eggs, making sure it’s fully coated. Let the excess egg drip off to prevent sogginess.
- Press the chicken into the panko breadcrumb mixture, ensuring an even, thick coating. Gently press to help the crumbs stick well. Repeat the process to double-bread for extra crunch.
- Heat the oil in your skillet or deep-fryer to 175°C/350°F. Use a thermometer to check the temperature—look for shimmering oil, but avoid smoking.
- Carefully add 3–4 chicken tenders into the hot oil, placing them gently to avoid splashes. Fry for about 4–5 minutes, turning occasionally with tongs, until they’re deep golden and crispy.
- Use tongs to remove the tenders from the oil once they’re evenly golden and crispy, then transfer them to a wire rack to drain excess oil and keep the crust crisp.
- Repeat frying in batches until all chicken tenders are cooked to perfection. Let them rest for 2 minutes before serving to settle the juices and enhance crispiness.
- Serve your crispy chicken tenders hot, with your favorite dips and sides. The crust should be crackly, and the inside tender and juicy, making each bite satisfying and flavorful.
Pro tips for ultra-crispy tenders
- Use cold oil for frying—keeps tenders crispy and prevents sogginess.
- Maintain steady heat—keep oil at 175°C/350°F for even cooking.
- Double-bread for crunch—dip twice in egg and breadcrumbs to maximize crispiness.
- Don’t overcrowd the pan—fry in batches to prevent temperature drops.
- Rest before serving—let fried tenders sit for 2 minutes to lock in juiciness and crisp.
- Check for golden color—tenders should be evenly golden and crackly before removing.
- Use tongs—handle hot tenders carefully to avoid breaking the crust.
Common mistakes and how to fix them
- FORGOT to pat chicken dry → Causes uneven coating, dry surface might burn faster.
- DUMPED breading mixture → Leads to uneven crust, gently press for adhesion.
- OVER-TORCHED oil → Oil smokes and flavors burn, keep temperature steady at 175°C/350°F.
- MISSED resting time → Resting prevents oil absorption, let tenders sit 2 minutes before serving.
Quick fixes and pantry swaps
- When oil shimmers, splash a tiny drop of water—if it crackles, it’s ready to fry.
- If tenders stick, gently loosen with tongs—avoid forcing, which tears the crust.
- Splash extra flour or breadcrumbs if coating feels damp—helps adhere better.
- Patch burnt oil by lowering heat immediately—drain and start fresh with clean oil.
- Shield delicate tenders from splatter by using a splatter guard—keeps the kitchen cleaner.
Prep, store, and reheat tips
- Prep chicken tenders: Slice and bread them up to a day in advance; keep refrigerated to maintain freshness and prevent drying out. The breading stays crisp if kept dry and covered.
- Store cooked tenders: Keep leftovers in an airtight container in the fridge for up to 3 days. Reheat in a hot oven or air fryer until crispy again, about 4–5 minutes, to revive that crunch.
- Freeze for longer storage: Lay cooked or uncooked tenders on a baking sheet, freeze until solid, then transfer to a zip-top bag. They’ll last up to 2 months; reheat directly from frozen for best texture.
- Reheating tips: For maximum crispness, avoid microwave reheats. Instead, bake at 180°C/350°F for 5–7 minutes or air fry at 200°C/390°F until hot and crackly. Expect slight texture loss, but flavor stays bright.
Top questions about chicken tenders
1. Can I use frozen chicken breasts?
Use thick, fresh chicken breasts; they stay juicy and cook evenly, giving you tender bites. Frozen can work in a pinch, but fresh is best for flavor.
2. Should I thaw the chicken first?
Yes, but thaw them completely first. Pat dry to remove excess moisture, which helps the breading stick and crisp up better.
3. Is double-breading necessary?
Double-breading—dip in flour, then egg, then breadcrumbs twice—creates a thick, crunchy crust that stays crispy longer.
4. How hot should the oil be?
Maintain the oil temperature at around 175°C/350°F; too hot burns the crust, too cold makes tenders greasy and soggy.
5. How do I know when they’re done?
Look for a deep golden-brown color, a crackly crust, and ensure the inside is opaque and firm but juicy when pierced.
6. Can I substitute regular breadcrumbs?
Use panko breadcrumbs for extra crunch. They’re big, airy flakes that crisp up beautifully and stay crispy longer than regular breadcrumbs.
7. Can I bake or air fry these?
Yes, baking or air frying can work if you prefer less oil. Expect slightly less crunch but still tender, flavorful tenders.
8. Why are my tenders soggy?
To prevent sogginess, don’t overcrowd the pan and let the tenders rest a couple of minutes after frying before serving.
9. How do I reheat leftovers?
Reheat in a hot oven or air fryer at 180°C/350°F for 4–5 minutes until crispy again. Avoid microwaves to keep the crust crunchy.
10. What oil is best for frying?
Use neutral oils like vegetable or canola, which have high smoke points and won’t impart unwanted flavors. Keep oil fresh for best results.
These tenders might seem straightforward, but mastering that perfect crunch and tender inside is a small victory worth savoring. When you fry them just right, the aroma of crispy chicken filling the kitchen is a reminder of how simple techniques can turn everyday ingredients into something memorable.
In times when comfort food feels especially needed, this recipe offers a satisfying, nostalgic bite wrapped in a crackly crust. They’re perfect for sharing, for a quick weeknight dinner, or just because the craving hits. Sometimes, it’s the chaos in the kitchen that leads to the best bites.