
I’ve always loved spring rolls for their crunch and fresh flavors, but frying them always felt like a messy, greasy chore. One day, I decided to bake them instead, aiming for that same crispy exterior without the oil splatters and lingering grease. Turns out, you get a surprisingly satisfying crunch, and it’s way easier to keep an eye on them in the oven.
This baked version isn’t just healthier; it’s also a little more forgiving. No need to heat up a pot of oil or worry about the temperature dropping mid-fry. Plus, the oven’s even heat helps turn out a uniform, golden crust every time. It’s perfect for those nights you crave something crispy but want to keep things simple and clean in the kitchen.
This recipe transforms the usual fried spring rolls into a healthier baked version, proving you don’t need deep-frying to get that crispy, golden exterior. It’s a game of balance—crisp enough to bite into, without the fuss of hot oil splatters and greasy hands. I stumbled on this method after too many kitchen mishaps with oil and wanted something simpler, yet just as satisfying.
The story behind this recipe
- I first made these baked spring rolls after a weekend of too much fried food. I craved something crispy but a little gentler on the stomach and the kitchen. Baking seemed like a lazy, smart way to get that crunch without the mess.
- The idea clicked when I realized I could get a golden, crispy shell with just a light brush of oil. It was a small victory—more control, less fuss. Now, I keep this recipe handy, especially when I want something satisfying without the greasy aftermath.
- heading: “The inspiration behind this recipe”
Ingredient Breakdown: Key Components
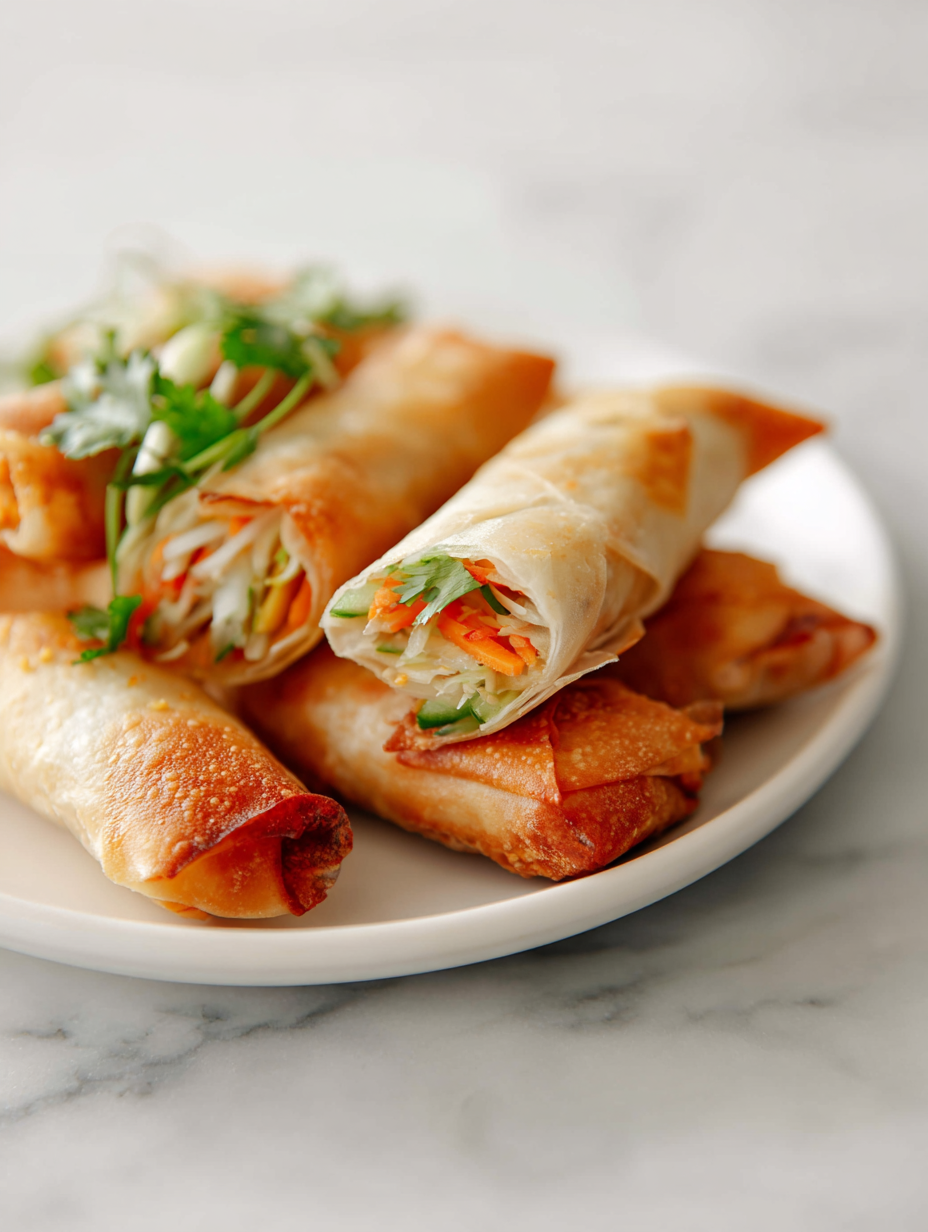
- Spring roll wrappers: I prefer the rice paper variety for their delicate crunch, but traditional wheat wrappers work just as well if you want a sturdier bite. Keep them covered with a damp towel to prevent drying out.
- Vegetable filling: I love a mix of shredded carrots, cabbage, and a splash of soy sauce. For extra flavor, toss in a dash of sesame oil—gives it a smoky aroma that really wakes up the filling.
- Cooking oil spray: A light mist is all you need to help the edges crisp up beautifully. Too much, and the rolls might turn greasy instead of crispy.
- Egg wash (optional): Brushing with a beaten egg before baking gives that shiny, golden finish. Skip if you want a more matte look or are vegan.
- Dipping sauce: I keep a simple soy and rice vinegar mix, bright with a touch of honey. It’s the perfect tangy counterpoint to the savory rolls—think zesty, not overpowering.
- Herbs: Fresh cilantro or mint leaves add a burst of freshness—don’t skip these if you want that lively, green flavor that cuts through the richness.
- Sesame seeds: Sprinkled on top before baking, they toast up nicely, adding a nutty aroma and a slight crunch that makes the presentation pop.
Spotlight on key ingredients
Spring roll wrappers:
- I prefer rice paper for their delicate, translucent look and crisp bite. Keep them covered with a damp towel to prevent drying out.
- Vegetable filling: Shredded carrots, cabbage, and a splash of soy sauce. The crunch and fresh sweetness make every bite lively and satisfying.
- Cooking oil spray: Just a light mist. Too much, and the rolls turn greasy instead of crisp, but just enough gives that shiny, golden finish.
Herbs and seeds:
- Fresh herbs: Cilantro or mint add a burst of green, aromatic freshness. Their bright, zesty notes contrast beautifully with the savory filling.
- Sesame seeds: Sprinkled before baking, they toast up to add a nutty aroma and a slight crunch. They make the presentation look inviting and add depth to the flavor.
Notes for ingredient swaps
- Vegetarian options: Use mushrooms or tofu instead of pork or shrimp. They bring umami and a meaty texture, though they won’t be as juicy.
- Gluten-Free: Rice paper wrappers are naturally gluten-free, but check labels if store-bought. Wheat wrappers can be swapped with rice or other gluten-free alternatives for a similar crunch.
- Vegan: Skip eggs for sealing or brushing; substitute with a little water mixed with cornstarch for sealing and oil for brushing. The texture stays crisp, but the shine might be a touch softer.
- Low-Sodium: Use reduced-sodium soy sauce or tamari. It still adds flavor but keeps saltiness in check, especially if serving with salty dipping sauces.
- Fresh Herbs: Swap cilantro or mint with basil or Thai basil. They offer different aromatic qualities but keep that green, lively punch.
- Oil: Light cooking spray or a brush of sesame oil works for crisping without excess greasiness. Too much oil can make the rolls greasy and heavy.
- Dipping Sauces: Soy-vinegar mix can be replaced with sweet chili or peanut sauce for a richer, creamier dip that complements the baked crispness.
Equipment & Tools
- baking sheet: To hold the spring rolls while baking evenly.
- parchment paper: Prevent sticking and make cleanup easier.
- brush: To apply egg wash or oil for crisping.
- spray bottle: To lightly mist rolls with oil for even browning.
Step-by-step guide to baked spring rolls
- Gather your equipment: a baking sheet, parchment paper, a brush, and a spray bottle. Preheat your oven to 200°C (390°F).
- Prepare the filling: combine shredded vegetables with soy sauce, sesame oil, and a pinch of salt. Mix well and set aside.
- Lay out a spring roll wrapper on a damp towel to prevent drying. Spoon about 2 tablespoons of filling near one corner.
- Fold the corner over the filling, then tightly roll up, tucking in the sides as you go. Seal the edge with a little water or beaten egg.
- Place the rolled spring rolls on the parchment-lined baking sheet, seam side down. Lightly spray or brush with oil for crispness.
- Optionally, brush the tops with beaten egg for a shiny, golden finish. Sprinkle with sesame seeds if desired.
- Bake in the oven for about 20-25 minutes, turning halfway through. Watch for a golden-brown, crispy exterior.
- Once baked, remove from oven and let rest for 5 minutes. Serve with your favorite dipping sauce—soy, sweet chili, or tangy vinegar.
- Check for doneness: the rolls should be evenly golden, crispy on the outside, and the filling hot and slightly oozy when cut.
Let the rolls rest for 5 minutes to set the crust. Serve warm with dipping sauces. For extra crunch, briefly re-bake if needed.
How to Know It’s Done
- The outside is deep golden and crispy, not pale or soggy.
- The filling is hot, with steam escaping when sliced.
- The edges are sealed well, with no filling leaking out during baking.
Baked Spring Rolls
Ingredients
Equipment
Method
- Preheat your oven to 200°C (390°F) and line a baking sheet with parchment paper. Gather your wrappers and filling ingredients.
- Combine shredded carrots, cabbage, soy sauce, and sesame oil in a bowl. Mix well until the vegetables are evenly coated and slightly softened.
- Lay a spring roll wrapper flat on a damp towel to prevent drying. Spoon about 2 tablespoons of the vegetable filling near one corner of the wrapper.
- Fold the corner over the filling, then tightly roll up the wrapper, tucking in the sides as you go. Seal the edge with a little water or beaten egg to prevent it from opening during baking.
- Place the rolled spring rolls seam side down on the prepared baking sheet, spacing them evenly. Lightly spray or brush the tops with oil for a crispy finish.
- If desired, brush the tops with beaten egg for a glossy, golden look. Sprinkle sesame seeds on top for added crunch and visual appeal.
- Bake the spring rolls for about 20-25 minutes, turning the baking sheet halfway through, until they are deep golden brown and crispy.
- Remove the baked rolls from the oven and let them rest for 5 minutes to set the crust. They should be crisp and fragrant with a slight crunch when you bite into them.
- Serve the baked spring rolls warm with your favorite dipping sauce, such as soy, sweet chili, or vinegar-based dips.
Notes
Pro tips for perfect baked spring rolls
- Bolded mini-head: Use a light mist of oil to evenly crisp the rolls without greasiness, avoiding excess oil.
- Bolded mini-head: Keep wrappers covered with a damp towel to prevent drying out and cracking during assembly.
- Bolded mini-head: Seal edges thoroughly with water or beaten egg to prevent filling leaks while baking.
- Bolded mini-head: Bake at 200°C (390°F) for an even, golden crust; higher temps can burn the wrapper.
- Bolded mini-head: Rotate the baking sheet halfway through to ensure uniform crispness and color.
- Bolded mini-head: For extra shine, brush the rolls with beaten egg before baking—watch for that glossy, golden finish.
- Bolded mini-head: Rest baked rolls for 5 minutes to allow the crust to set; serve warm for best crunch.
Common mistakes and how to fix them
- TOO MUCH OIL: Use a light spray; excess makes rolls greasy and heavy.
- NOT SEALING WELL: Wet edges thoroughly to prevent filling leaks during baking.
- OVEN TOO HOT: Bake at 200°C (390°F); higher temps risk burning the wrapper.
- FILLING TOO MOIST: Drain excess liquid from vegetables to avoid soggy rolls.
Quick fixes for baked spring rolls
- When rolls stick, splash a little water on the edges before sealing.
- If rolls are pale, increase oven temperature slightly and bake a few more minutes.
- Dumped filling? Carefully scoop out excess and patch with a dab of water and seal again.
- Over-torched edges? Cover with foil and lower oven temp to prevent burning.
- When rolls are soggy, rescue with a quick 5-minute re-bake at 180°C (350°F), shimmer of oil and crackle sound return.
Prep, store, and reheat tips
- Prepare the filling and assemble the rolls a day in advance; keep covered in the fridge to maintain freshness and prevent drying out.
- Stored baked spring rolls stay crispy for up to 2 days in an airtight container in the fridge, but reheating is key to restoring crunch.
- Reheat in a 180°C (350°F) oven for 8-10 minutes until the exterior re-crisps, with a slight shimmer of oil and a warm filling that’s just right.
- Avoid freezing baked rolls as they tend to lose their crispness; best enjoyed fresh or within the first two days.
Top questions about baked spring rolls
1. How do I ensure they stay crispy?
Use a light spray of oil to get that crispy exterior without greasiness. Too much oil can make the rolls soggy.
2. How do I keep the filling inside while baking?
Seal the edges with a bit of water or beaten egg. This prevents filling from leaking out during baking.
3. What’s the perfect baking time and temperature?
Bake at 200°C (390°F) for 20-25 minutes, turning halfway. Look for a golden-brown, crispy shell.
4. Can I make these ahead of time?
Prep the filling a day ahead and assemble just before baking. Store in the fridge covered to keep fresh.
5. How do I reheat without losing crunch?
Reheat in a 180°C (350°F) oven for 8-10 minutes until crispy and heated through. Keep an eye on the color.
6. What wrapper should I use?
Use rice paper wrappers if you want a delicate, translucent look. Wheat wrappers are sturdier but less delicate.
7. Are there vegan substitutes I can use?
Skip eggs for vegan options—use a water and cornstarch mix for sealing and a light oil spray for crisping.
8. How do I keep wrappers from drying out?
Make sure to cover the wrappers with a damp towel to prevent drying out during assembly.
9. How do I know when they are done?
Check for doneness by color (golden and crispy), filling temperature (hot and steamy), and edges (well sealed).
10. What if the rolls stick or break?
If the rolls stick, spray a little water on the edges before sealing again. A quick fix for perfect seals.
Baked spring rolls feel like a quiet victory—crisp, golden, and way less greasy than their fried counterparts. They’re perfect for a weeknight treat or when you want something satisfying without the fuss and mess of frying.
This recipe reminds me that simple swaps can make a big difference. Plus, they’re a little healthier, which is a good excuse to make them more often. Sometimes, it’s the small changes that make the biggest impact in the kitchen.