
I’ve always loved mozzarella sticks but hated the greasy mess that comes with deep frying. So I started experimenting with baking, trying to keep that satisfying cheesy pull and crispy shell without the splatters and excess oil. Turns out, with a good breadcrumb coating and a hot oven, you can get pretty close to that fried crunch—just healthier and less chaotic.
This recipe came together on a lazy weekend when I craved something cheesy and crunchy but didn’t want to deal with the usual fuss. It’s not about perfect perfection, but about that honest, satisfying snack that’s easy to pull off after work or during a movie night. Plus, the smell of melting cheese and toasted breadcrumbs filling the kitchen? Well, that’s a comfort I didn’t realize I needed.
Focusing on a healthier, oven-baked twist that retains the crispy, cheesy goodness of traditional fried mozzarella sticks, but with less mess and guilt.
The story behind this recipe
- This recipe was born out of a messy, cheesy experiment late one Sunday night. I was craving that crispy, gooey bite but didn’t want the usual deep-fried mess. Baking seemed like the perfect way to keep it simple and less greasy, but I was skeptical if it could still hold that satisfying crunch and cheesy pull.
- After a few tries, I found that a double coating of seasoned breadcrumbs and a hot oven really did the trick. The smell of toasted breadcrumbs mingling with melting cheese has become a kind of cozy, homey marker in my kitchen. It’s become my go-to for quick snacks that feel special, even if I’m just making them for myself.
- heading
- story_type
Key ingredients and tips
- Mozzarella sticks: I love using block mozzarella because it melts beautifully and stays gooey. You can try string cheese if you want easier prep, but it might be less cheesy and more rubbery.
- Breadcrumbs: I prefer panko for that extra crunch and lightness. If you only have regular breadcrumbs, toast them a bit first to boost flavor and crispness.
- Egg wash: It’s the glue that holds the coating. For a richer flavor, add a pinch of garlic powder or smoked paprika—just a hint of smoky aroma that complements the cheese.
- Flour: I use all-purpose flour for the initial coat. If you want a gluten-free version, try rice flour or cornstarch—just expect a slightly lighter crust.
- Oil spray: A quick spray before baking helps the coating crisp up. Use a light, even mist to avoid sogginess and ensure that golden color.
- Herbs & spices: I toss in a little Italian seasoning or chili flakes into the breadcrumb mixture for a flavor boost. Feel free to skip or add your favorites for a personalized touch.
- Optional dip: I love a simple marinara or garlic aioli for dipping. They add a zing that cuts through the cheesy richness, but keep it straightforward if you prefer the pure mozzarella experience.
Spotlight on key ingredients
Mozzarella cheese:
- Mozzarella sticks: I love using block mozzarella because it melts beautifully and stays gooey. You can try string cheese if you want easier prep, but it might be less cheesy and more rubbery.
- Breadcrumbs: I prefer panko for that extra crunch and lightness. If you only have regular breadcrumbs, toast them a bit first to boost flavor and crispness.
- Egg wash: It’s the glue that holds the coating. For a richer flavor, add a pinch of garlic powder or smoked paprika—just a hint of smoky aroma that complements the cheese.
Breadcrumbs:
- Panko breadcrumbs: I love using these for that airy crunch that turns golden and crispy in the oven. If all you have is regular, toasting them first adds a nice flavor boost.
- Egg mixture: The beaten eggs help the breadcrumbs stick; adding a splash of milk or a pinch of paprika can give it an extra flavor punch. Watch for a shiny, slightly thick coating when dipped.
Notes for ingredient swaps
- Dairy-Free: Use plant-based cheese like cashew or coconut-based melts. They melt differently—less oozy, more firm but still satisfying.
- Breadcrumbs: Swap panko for crushed cornflakes for an extra crunch and a slightly sweeter flavor profile.
- Egg Wash: Replace eggs with a mixture of almond milk and a teaspoon of Dijon mustard for binding without eggs.
- Flour: Use chickpea or rice flour if you’re gluten-free; they provide a different texture but still coat well.
- Oil Spray: Opt for avocado oil spray for a milder scent and higher smoke point, ensuring crispiness without smell.
- Herbs & Spices: Add smoked paprika or lemon zest into breadcrumbs for a bright, smoky note that lifts the whole bite.
- Dipping Sauce: Try a spicy sriracha mayo instead of marinara for a fiery contrast to cheesy richness.
Equipment & Tools
- Baking sheet: To hold the mozzarella sticks during baking.
- Parchment paper or silicone mat: To prevent sticking and make cleanup easier.
- Three shallow dishes: For flour, eggs, and seasoned breadcrumbs for breading.
- Cooling rack (optional): To cool the sticks and keep them crispy post-baking.
- Spray bottle or oil mister: To lightly spray the tops for extra crispness.
Step-by-step guide to baked mozzarella sticks
- Preheat your oven to 220°C (430°F). Line a baking sheet with parchment paper or a silicone mat. Have your ingredients ready: mozzarella sticks, flour, beaten eggs, and seasoned panko breadcrumbs.
- Cut mozzarella into sticks about 10cm (4 inches) long and 1cm (0.5 inch) thick. Freeze the sticks for at least 30 minutes—this helps prevent melting during baking.
- Set up a breading station: Place flour in a shallow dish, beaten eggs in another, and seasoned panko breadcrumbs in a third. Season the breadcrumbs with salt, pepper, and optional herbs or spices.
- First, roll each frozen mozzarella stick in flour, tapping off excess. Then, dip into the beaten eggs, ensuring full coverage.
- Next, coat the sticks thoroughly in seasoned panko breadcrumbs. For extra crunch, repeat the egg and breadcrumb step for a double coating.
- Arrange the coated sticks on your prepared baking sheet, leaving space between each. Lightly spray the tops with cooking spray to promote crispiness.
- Bake in the preheated oven for 8-10 minutes. Check for golden-brown color and a crackling sound when you tap the coating. The cheese should be soft but not melted through.
- Remove from oven and let rest for 2 minutes. Serve immediately with your favorite dipping sauce—marinara or garlic aioli work beautifully.
- For a crispier finish, broil for an additional 1-2 minutes, watching closely to prevent burning. Keep an eye on the color and smell that toasty aroma.
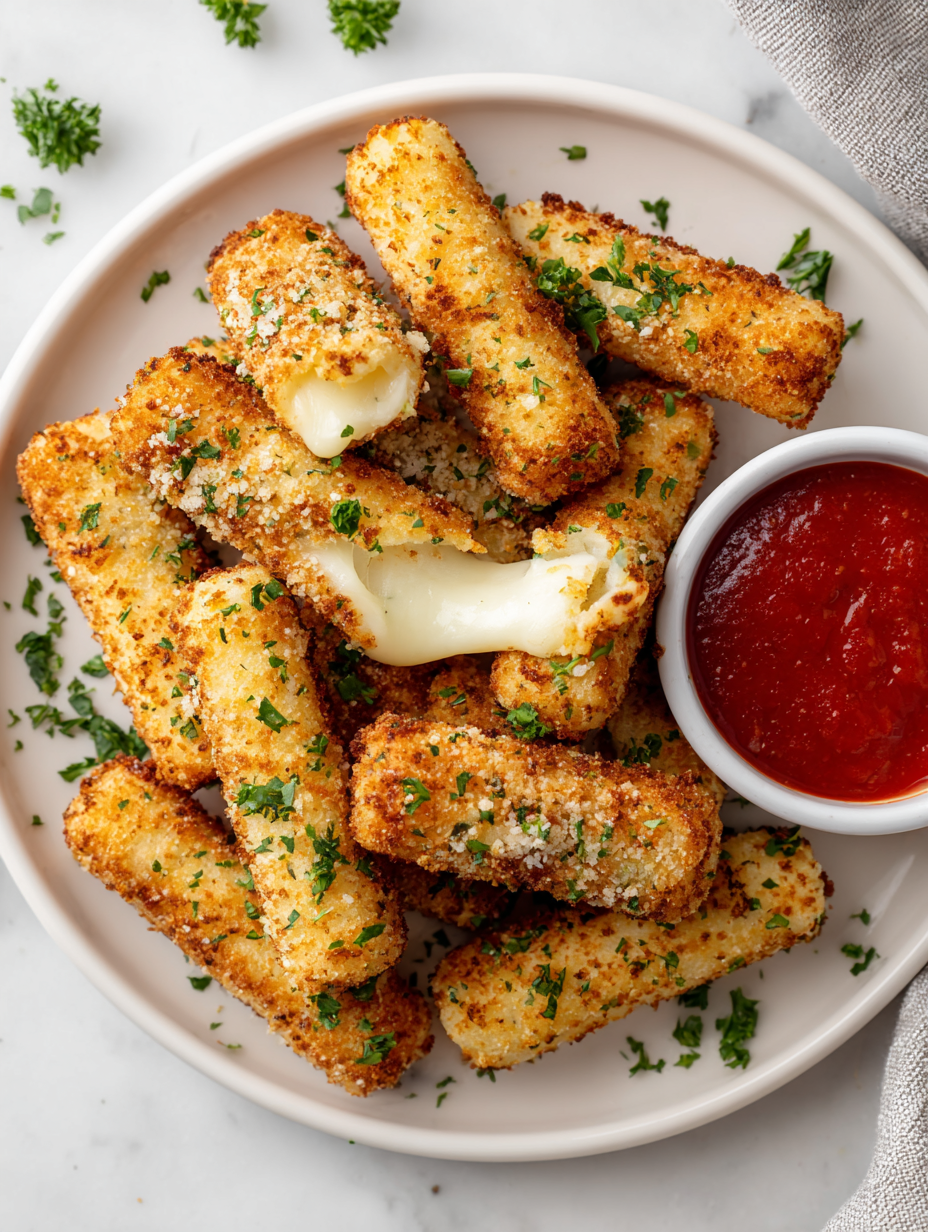
Let the mozzarella sticks rest for 2 minutes to set the cheese before serving. Plate with a side of marinara or aioli for dipping. Serve immediately while hot and crispy.
How to Know It’s Done
- Coating is golden and crispy, with an even color.
- Mozzarella is soft and oozy when gently pressed, but not melted through.
- Crust crackles when tapped, indicating proper crispness.
Baked Mozzarella Sticks
Ingredients
Equipment
Method
- Start by cutting the mozzarella block into four equal sticks, about 10cm long and 1cm wide. Place the sticks on a baking sheet and freeze for at least 30 minutes—this helps prevent melting during baking.
- Set up your breading station with three shallow dishes: one with flour, one with beaten eggs, and the third with seasoned panko breadcrumbs mixed with herbs or spices if you like. Keep everything within reach for easy coating.
- Take a frozen mozzarella stick and roll it in the flour, pressing gently to coat evenly. Shake off any excess.
- Dip the floured stick into the beaten eggs, making sure it's fully coated with a shiny, slightly thick layer of egg.
- Next, roll the stick in the seasoned panko breadcrumbs, pressing gently to ensure the coating sticks well. For extra crunch, repeat the egg and breadcrumb steps for a double coat.
- Place the breaded mozzarella sticks on the prepared baking sheet lined with parchment or a silicone mat, leaving space between each. Lightly spray the tops with cooking spray for extra crispness.
- Bake in a preheated oven at 220°C (430°F) for 8–10 minutes, or until the coating turns golden brown and crispy. Listen for a gentle crackle when tapping the crust to check for perfect crunch.
- Remove the sticks from the oven and let them rest for 2 minutes to allow the cheese to set slightly inside, reducing oozing when served.
- Serve the mozzarella sticks immediately with your favorite dipping sauce, like marinara or garlic aioli, while they're hot and crispy.
Notes
Pro tips for perfect baked mozzarella sticks
- coating: Use panko for a light, airy crunch that bakes up crisp and golden.
- Even coating: Press breadcrumbs firmly onto frozen mozzarella for uniform crispness.
- Proper spray: Lightly mist with oil before baking to enhance browning and crunch.
- Temperature check: Bake at 220°C (430°F) until golden, about 8–10 minutes.
- Rest time: Allow sticks to rest 2 minutes after baking to let cheese set for maximum ooze.
- Double coating: For extra crunch, repeat egg and breadcrumb step before baking.
- Check for crackle: Tap gently—if it crackles, it’s ready and crispy.
Common mistakes and how to fix them
- FORGOT to preheat oven → Always start hot to crisp coating quickly.
- DUMPED cheese too early → Wait until mozzarella is just softened, not melted through.
- OVER-TORCHED breadcrumbs → Keep an eye on the color; golden is perfect, burnt is ruined.
- MISSED the resting step → Rest for 2 minutes to let cheese set before serving.
Quick fixes and pantry swaps
- When burning breadcrumbs, quickly shield with foil to prevent further charring.
- Splash a bit of water on oven rack if mozzarella melts too fast and drips.
- Patch stuck mozzarella with a toothpick if cheese oozes out during baking.
- Dumped too much oil? Blot with paper towels to absorb excess moisture and crisp up.
- Whenever cheese isn’t oozy enough, bake an extra 2 minutes and watch for shimmer of melted cheese.
Prep, store, and reheat tips
- Prep mozzarella sticks: Shape and freeze for at least 30 minutes to prevent melting during baking, ensuring crispy coating.
- Store baked leftovers in an airtight container in the fridge for up to 2 days; reheat in oven for best crunch and gooeyness.
- For longer storage, freeze unbaked coated sticks for up to 1 month; bake directly from frozen, adding a minute or two.
- Reheat in a 190°C (375°F) oven for 5–7 minutes until hot and crisp, with cheese melty and coating crackling.
Top questions about baked mozzarella sticks
1. How do I prevent the cheese from melting too fast?
Use block mozzarella and freeze the sticks for at least 30 minutes before baking. This helps prevent melting and keeps the coating crispy.
2. Can I use regular breadcrumbs instead of panko?
Yes, panko breadcrumbs give a lighter, crunchier crust. Toast regular breadcrumbs first if you don’t have panko for extra crispness.
3. What’s the ideal baking temperature and time?
Bake at 220°C (430°F) for 8–10 minutes or until golden. Check the color and listen for a crackling sound when tapped.
4. How should I reheat baked mozzarella sticks?
Reheat leftovers in a 190°C (375°F) oven for 5–7 minutes until hot and crispy. Rest for 2 minutes before serving.
5. How do I get the sticking coating extra crispy?
For extra crunch, double coat the mozzarella sticks with egg and breadcrumbs before baking. Spray lightly with oil for better browning.
6. What’s the best way to bread the cheese sticks?
Use a mixture of mozzarella sticks, flour, eggs, and seasoned panko. Keep ingredients cold and handle quickly for best coating.
7. What if the breadcrumbs burn or the cheese leaks out?
If breadcrumbs burn, shield with foil or lower oven rack. For melted cheese, bake a bit longer or broil carefully.
8. Any tips for achieving crispy coating?
Use olive oil spray before baking to promote even crisping. Keep oven temperature steady for uniform color.
9. Can I make these in advance?
Yes, you can prepare sticks ahead and freeze for 30 minutes or more. Bake directly from frozen, adding a minute or two.
10. How do I fix cheese not melting enough?
If the cheese isn’t oozy enough, bake an extra minute or broil briefly to enhance melty texture and golden color.
These baked mozzarella sticks are a reminder that simple comfort food can be both satisfying and less messy. They’re perfect for a quick snack or a casual gathering, filling the kitchen with that irresistible cheesy aroma. Honestly, once you get the hang of the crispy coating, you’ll find yourself reaching for these more often than you’d think.
In a world that’s rushing by, it’s nice to have a recipe like this that’s straightforward and genuinely tasty. They’re a little bit nostalgic, a little bit indulgent, and just right for whenever that cheesy craving strikes. Sometimes, the best bites are the ones you make yourself, with just a few honest ingredients and a little patience.