
Growing up, cheese balls were the highlight of every snack table, their crispy outsides giving way to gooey, salty centers. I loved how they felt like a little secret—something indulgent and fun, yet surprisingly simple to make at home. Over the years, I’ve tweaked that childhood favorite into an oven-baked version that’s just as satisfying but a bit more refined for grown-up gatherings.
This recipe is my way of reclaiming that nostalgic joy, turning a messy, fried snack into something you can bake to perfection. It’s a perfect blend of crispy texture and melty cheese, but with less fuss and less oil—more about savoring each bite without the grease dripping down your chin. Plus, it’s a great way to impress friends with a snack that feels both familiar and elevated.
Focusing on the nostalgic comfort of childhood snacks, but elevating them with a sophisticated oven-baked twist that makes them perfect for sharing at grown-up gatherings.
The story behind this recipe
- I first made these cheese balls during a chaotic holiday dinner, trying to keep things simple but still crave-worthy. The smell of melting cheese and toasted breadcrumbs filled my tiny kitchen, bringing back childhood memories of snack times that felt like small celebrations. It was a moment where comfort food met the need for quick, satisfying bites that could turn a hectic evening into a cozy one.
- Over time, I’ve tweaked the recipe to make it less greasy and more manageable for weeknights. Now, these baked cheese balls are my go-to for spontaneous gatherings or quiet nights when I need a little cheesy lift. They remind me that good things don’t have to be complicated—sometimes, just a crispy outside and gooey center do the trick.
- heading
- story_type
Key ingredients at a glance
- Cheddar cheese: I love the sharp, tangy bite it adds. Use a good melting variety, or it can be a bit gritty.
- Breadcrumbs: I prefer panko for extra crunch, but regular fine breadcrumbs work if you want softer bites. Toast them lightly for more flavor.
- Egg: It helps bind everything together, making the mixture easier to roll. If you’re vegan, try a flaxseed egg — it won’t bind quite as well but still works.
- Garlic powder: Adds a warm aroma and depth. If you love heat, sprinkle in some smoked paprika instead for smoky richness.
- Herbs: Chopped parsley or chives give freshness. Skip or swap for dried herbs if fresh isn’t available, but fresh is best for brightness.
- Oil for baking: A light spray of neutral oil helps the tops turn golden and crispy. Use an oil with a high smoke point, like avocado or canola.
- Salt: I adjust it based on how salty my cheese is. Do a quick taste test before baking—too much can overwhelm, too little can be bland.
Spotlight on key ingredients
Cheddar cheese:
- I love the sharp, tangy bite it adds. Use a good melting variety, or it can be a bit gritty.
- Breadcrumbs: I prefer panko for extra crunch, but regular fine breadcrumbs work if you want softer bites. Toast them lightly for more flavor.
- Egg: It helps bind everything together, making the mixture easier to roll. If you’re vegan, try a flaxseed egg — it won’t bind quite as well but still works.
Breadcrumbs:
- I prefer panko for extra crunch, but regular fine breadcrumbs work if you want softer bites. Toast them lightly for more flavor.
- Egg: It helps bind everything together, making the mixture easier to roll. If you’re vegan, try a flaxseed egg — it won’t bind quite as well but still works.
Notes for ingredient swaps
- Dairy-Free: Swap cheese for a plant-based melting cheese or nutritional yeast — expect a nuttier, less gooey result.
- Gluten-Free: Use almond flour or crushed gluten-free crackers instead of breadcrumbs — it will be slightly denser but still crispy.
- Vegan: Replace cheese with a shredded vegan cheese blend and egg with a flaxseed or chia seed egg — less cheesy but still flavorful.
- Smoked Flavors: Add smoked paprika or chipotle powder in place of regular garlic powder — for a smoky, spicy kick.
- Herb Variations: Use dried herbs or fresh basil instead of parsley or chives — changes brightness but keeps flavor lively.
- Oil Choices: Switch to olive or sesame oil for baking spray — different aroma and slightly richer crust.
- Salt Levels: Adjust salt based on your cheese’s saltiness — start small, then taste and add more if needed.
Equipment & Tools
- Mixing bowl: Combine ingredients evenly.
- Spoon or spatula: Mix and fold ingredients.
- Ice cream scoop or spoon: Portion out uniform balls.
- Baking sheet: Hold cheese balls during baking.
- Parchment paper or silicone mat: Prevent sticking and facilitate easy cleanup.
- Wire rack: Cool cheese balls evenly and maintain crispiness.
Step-by-step guide to baked cheese balls
- Equipment & Tools: Gather a mixing bowl (to combine ingredients), a spoon or spatula (to mix), a small ice cream scoop or spoon (for portioning), a baking sheet (for baking), parchment paper or silicone mat (to prevent sticking), and a wire rack (for cooling).
- Preheat your oven to 200°C (390°F). Line your baking sheet with parchment or a silicone mat for easy cleanup.
- In the mixing bowl, combine 1 ½ cups shredded cheese (cheddar or your choice), 1 cup panko breadcrumbs, 1 beaten egg, 1 teaspoon garlic powder, 2 tablespoons chopped herbs, and a pinch of salt. Mix until well combined.
- Using the scoop or spoon, portion out about a tablespoon of mixture, then roll it between your palms into a firm ball. Place each ball onto the prepared baking sheet, spacing them about 2 inches apart.
- Spray the tops lightly with oil for golden, crispy exteriors. Bake in the preheated oven for 15-20 minutes, or until the cheese balls are puffed and golden around the edges.
- Check the color and aroma: they should be golden and smell cheesy and toasted. If they look pale, bake a few minutes longer. If they crack excessively, reduce oven temperature slightly.
- Remove from oven and let rest on the baking sheet for 5 minutes. Transfer to a wire rack to cool slightly before serving. The cheese inside should be gooey but not runny.
Let the cheese balls rest for 5 minutes on a wire rack. Serve warm or at room temperature for maximum gooeyness and crunch.
How to Know It’s Done
- Color: golden brown exterior, no overly pale spots.
- Texture: outside crispy, inside gooey and melty.
- Appearance: uniform balls with a slight crackle on top.
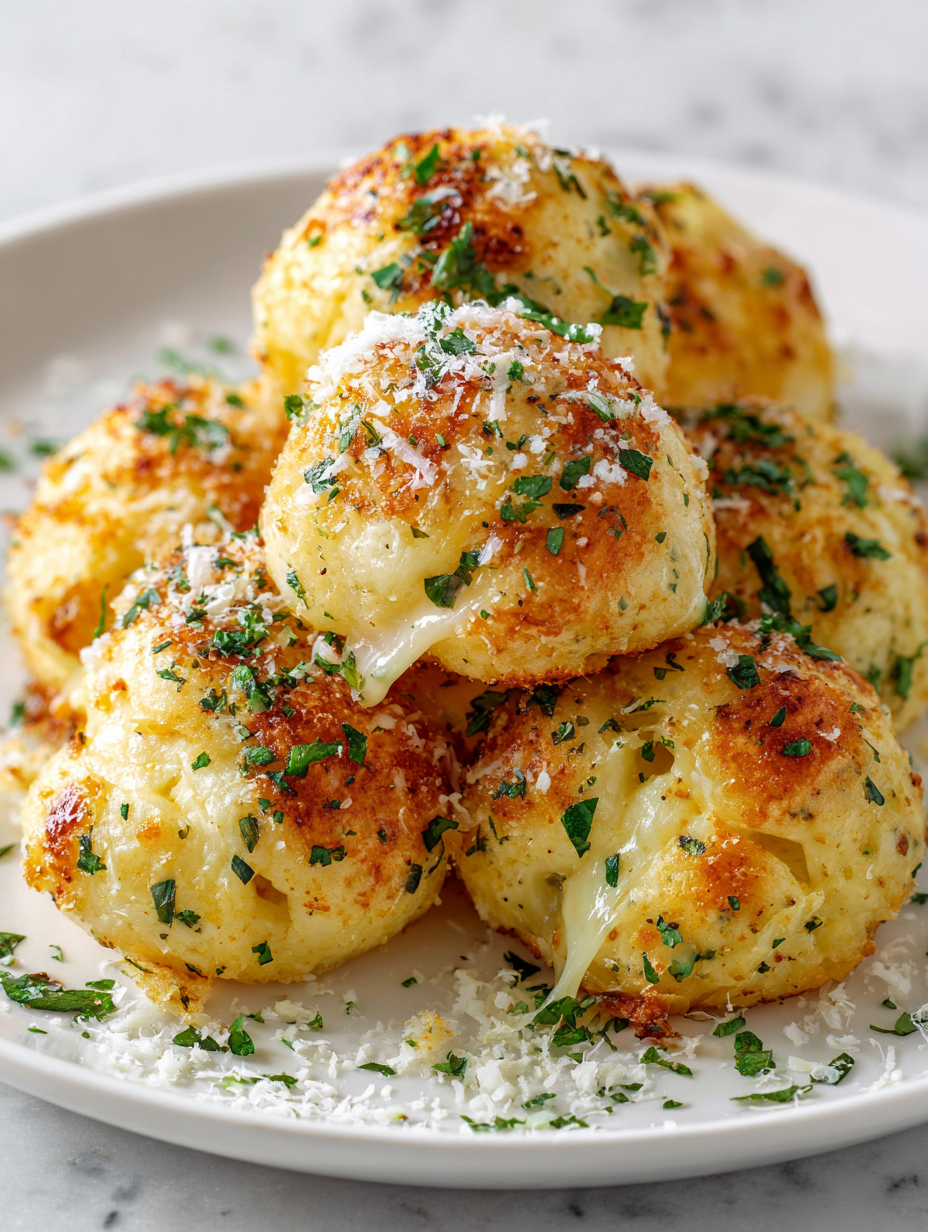
Oven-Baked Cheese Balls
Ingredients
Equipment
Method
- Preheat your oven to 200°C (390°F) and line a baking sheet with parchment paper or a silicone mat.
- In a large mixing bowl, combine the shredded cheese, panko breadcrumbs, garlic powder, chopped herbs, and a pinch of salt. Stir everything together until evenly mixed.
- Pour in the beaten egg and fold it into the mixture using a spatula, ensuring all ingredients are well incorporated and the mixture becomes sticky and cohesive.
- Using an ice cream scoop or a tablespoon, portion out about a tablespoon of the mixture and gently roll it between your palms into a compact ball.
- Place each formed cheese ball onto the prepared baking sheet, spacing them about 2 inches apart to allow for expansion.
- Lightly spray the tops of the cheese balls with oil to help them turn golden and crispy during baking.
- Bake in the oven for 15-20 minutes, or until the cheese balls are golden brown and crispy on the outside, with a bubbly, melty interior. Keep an eye on them to prevent over-browning.
- Remove the cheese balls from the oven and let them rest on the baking sheet for 5 minutes; this helps set the texture and prevents the cheese from oozing out immediately.
- Transfer the cheese balls to a wire rack to cool slightly, maintaining their crispy exterior while the inside remains deliciously gooey.
- Serve warm or at room temperature, enjoying the perfect contrast of crunchy outside and melty, cheesy inside.
Pro tips for perfect cheese balls
- & crispy: Spray the cheese balls lightly with oil before baking for a golden, crackly crust.
- Color check: Watch for a deep golden hue—this indicates the perfect crispy exterior and melty interior.
- Cheese melting: Bake until cheese just starts to ooze out slightly at the cracks—don’t overbake or it will dry out.
- Cooling trick: Rest on a wire rack for 5 minutes—this keeps the outside crispy while the inside stays gooey.
- Ingredient temp: Ensure cheese is shredded cold; warm cheese can make mixture sticky and hard to handle.
- Breadcrumb crunch: Toast breadcrumbs lightly before mixing for an extra savory, crunch-enhancing flavor.
- Oven heat: Bake at 200°C (390°F); too hot and they might burn, too cool and they won’t crisp properly.
Common mistakes and how to fix them
- FORGOT to preheat oven → Preheat to 200°C (390°F) before starting.
- DUMPED ingredients in haphazardly → Mix ingredients thoroughly for even flavor.
- OVER-TORCHED the cheese balls → Remove when golden and crispy, not burnt.
- MISSED resting time → Rest for 5 minutes to set texture before serving.
Quick fixes and pantry swaps
- When cheese oozes excessively, splash a little cold water to halt melting.
- If mixture feels too sticky, add a pinch more breadcrumbs and chill for 10 minutes.
- DUMPED in too much oil? Patch with a paper towel for quick absorption and crispy finish.
- When tops aren’t browning, shield with foil and extend baking by 3-5 minutes.
- Splash a lemon juice or vinegar if cheese balls smell overly sour or off, brightening flavor.
Prep, store, and reheat tips
- Prepare the mixture ahead: Combine cheese, breadcrumbs, herbs, and egg up to a day in advance. Keep chilled to prevent the cheese from melting prematurely and ensure easy handling later. The flavors meld slightly overnight, making the bites more cohesive.
- Shape the cheese balls: You can portion and roll the mixture into balls a few hours before baking. Store them on a plate covered tightly with plastic wrap in the fridge. They stay fresh and firm, with no loss of shape, for up to 24 hours.
- Storage and shelf life: Baked cheese balls are best enjoyed fresh, but can be kept in an airtight container in the fridge for 1-2 days. Reheat in the oven at 180°C (350°F) for 5-8 minutes until crispy and warm, with a delightful crackle and gooey center.
- Reheating tips: When reheating, watch for the cheese to start melting and the exterior to crisp up again. They won’t be quite as fresh as straight out of the oven but still deliciously cheesy and crunchy. Avoid microwaving, as it makes the cheese rubbery and soggy.
Top questions about baked cheese balls
1. What cheese works best for Baked Cheese Balls?
Use a mild, melting cheese like cheddar or mozzarella for gooeyness. Sharp cheeses add flavor but can be gritty if not shredded finely.
2. Can I freeze baked cheese balls?
Yes, you can freeze them after shaping. Just freeze on a tray, then transfer to a container. Bake directly from frozen, adding a few extra minutes.
3. How do I know when they’re done?
Bake until golden brown and crispy on the outside, with the cheese inside looking melty and just starting to ooze at cracks.
4. Can I use different breadcrumbs?
Use panko breadcrumbs for extra crunch. Regular breadcrumbs work, but panko gives a more satisfying crispiness.
5. What oven temperature and time do I use?
Bake at 200°C (390°F) for 15-20 minutes. They should be golden, crispy, and smell cheesy and toasted.
6. Are they vegan or dairy-free friendly?
Yes, swap in vegan cheese or nutritional yeast for a dairy-free version. Expect a nuttier flavor, less gooey but still tasty.
7. How do I get the mixture to hold together?
Ensure your cheese is shredded cold and the mixture is well combined. Chill the mixture if it feels too sticky, then roll into balls.
8. Should I let them rest after baking?
Rest the cheese balls on a wire rack for 5 minutes after baking. This helps keep the exterior crispy while the inside stays gooey.
9. Any tips for extra crunch?
Spray lightly with oil before baking for extra crispness. Keep an eye on color; they should be deep golden, not burnt.
10. How do I reheat leftovers?
Reheat in a 180°C (350°F) oven for about 5-8 minutes until crispy and warm. Avoid microwaving, which makes cheese rubbery.
These baked cheese balls carry a nostalgic punch, but with a crispness that’s more refined than fried. They’re perfect for when you want a cozy snack that looks like you put in effort, even if it’s just a quick bake. Honestly, they’re a little reminder that simple pleasures—cheese, crunch, and a touch of heat—never go out of style.
Plus, they’re versatile enough to serve at casual get-togethers or just as a satisfying treat for yourself. The smell of baked cheese mingling with toasted breadcrumbs might just become your new favorite kitchen aroma. And really, that gooey, crispy bite—well, it’s a small, cheesy victory every time.