Many recipes focus on frying, but I’ve found baking vegetable cutlets to be a game changer. The oven gives them a gentle, even crisp that’s not greasy or heavy, letting the natural flavors shine. Plus, it’s a lot less chaos in the kitchen, no splattering oil or smoky fumes.
This approach is about reclaiming a simple, honest method—turning humble vegetables into something a little more special without the usual fuss. The smell of baked spices mingling with roasted veg is a little nostalgic, a reminder of childhood snacks or cozy family dinners. It’s a method I keep coming back to, especially when I want something wholesome and satisfying without the cleanup.
Sometimes, the best ideas come from just experimenting with what’s in the fridge. Baking these cutlets is my way of making sure I get all that earthy sweetness and spice without the guilt of frying. I love how the oven transforms the texture—crisp on the outside, tender inside—like a little pocket of comfort. It’s a straightforward recipe, but it feels like a small victory each time I pull a tray of golden-brown cutlets out of the oven, ready to eat.
Focusing on the forgotten art of making vegetable cutlets that are crispy on the outside but tender inside, using a simple, no-fry baking method that brings out the natural sweetness and earthiness of the vegetables.
The story behind this recipe
- This recipe sprouted from a lazy Sunday afternoon in my tiny kitchen, where I was craving something satisfying but didn’t want to deal with the fuss of frying. I remembered my grandma’s vegetable patties, but thought, why not bake them instead? The oven’s gentle heat seemed perfect for coaxing out the natural sweetness of the veggies while keeping things light and crisp.
- Baking these cutlets was a happy accident—I got that crispy edge I loved, without the greasy mess I dreaded. The smell of toasted spices and roasting vegetables filled the kitchen, bringing back memories of family gatherings and simple, hearty meals. It’s become my go-to for a fuss-free, wholesome snack that still feels indulgent.
- heading: The story behind this recipe
Key ingredients and tips
- Carrots: I love the natural sweetness they bring, especially when roasted until they’re just tender and a little caramelized—try swapping with parsnips for a more earthy tone.
- Potatoes: They act as the binder, making the cutlets hold together. Use starchy potatoes like Russets; if you want lighter texture, sweet potatoes work well, too.
- Onions: I prefer finely chopped red onions for a mild, sweet flavor that caramelizes beautifully—skip if you’re sensitive to raw onion sharpness.
- Herbs & Spices: Fresh coriander and cumin give a vibrant aroma, but dried herbs can be a quick swap—just use half the quantity to avoid overpowering.
- Breadcrumbs: They create that crispy crust. Panko makes it extra crunchy, but regular breadcrumbs are fine—consider crushed oats for a nuttier twist.
- Binding Eggs: They help everything stick together. For a vegan version, mashed bananas or flaxseed mixed with water can do the trick, though the texture will differ slightly.
- Oil for Greasing: I use a neutral oil to prevent sticking and promote crisping—olive oil is my go-to, but coconut oil adds a subtle sweetness and aroma.
Spotlight on key ingredients
Carrots and Potatoes:
- Carrots: I love how they turn sweet and tender after roasting, with a slightly caramelized edge that adds depth. Swap with parsnips for a more earthy punch.
- Potatoes: They act as the binder, giving the cutlets structure. Russets make them fluffy inside, but sweet potatoes add a subtle sweetness and moisture.
Ingredient swap ideas
- Dairy-Free: Swap eggs for mashed bananas or flaxseed mixed with water; the texture will be slightly denser and less binding.
- Gluten-Free: Use rice flour or chickpea flour instead of breadcrumbs for a nutty flavor and a crisp exterior.
- Vegan: Replace eggs with a commercial egg replacer or a simple mixture of water and cornstarch; expect a slightly softer crust.
- Low-Sodium: Omit added salt and use herbs and spices more generously to boost flavor without the saltiness.
- Herb Variations: Fresh basil or parsley can replace coriander; adjust the quantity for a milder or more vibrant herbal note.
- Vegetable Swaps: Zucchini or cauliflower can replace carrots for a milder, more neutral flavor with a softer texture.
- Oil Choices: Use avocado or sesame oil for a different aroma and slightly richer flavor; just a teaspoon or two for brushing.
Equipment & Tools
- Baking sheet: To hold the cutlets as they bake, ensuring even heat distribution.
- Parchment paper or silicone mat: Prevents sticking and makes cleanup easier.
- Grater: To shred vegetables like carrots uniformly.
- Mixing bowl: To combine all ingredients thoroughly.
- Brush or pastry brush: To lightly oil the tops of the cutlets for golden crispness.
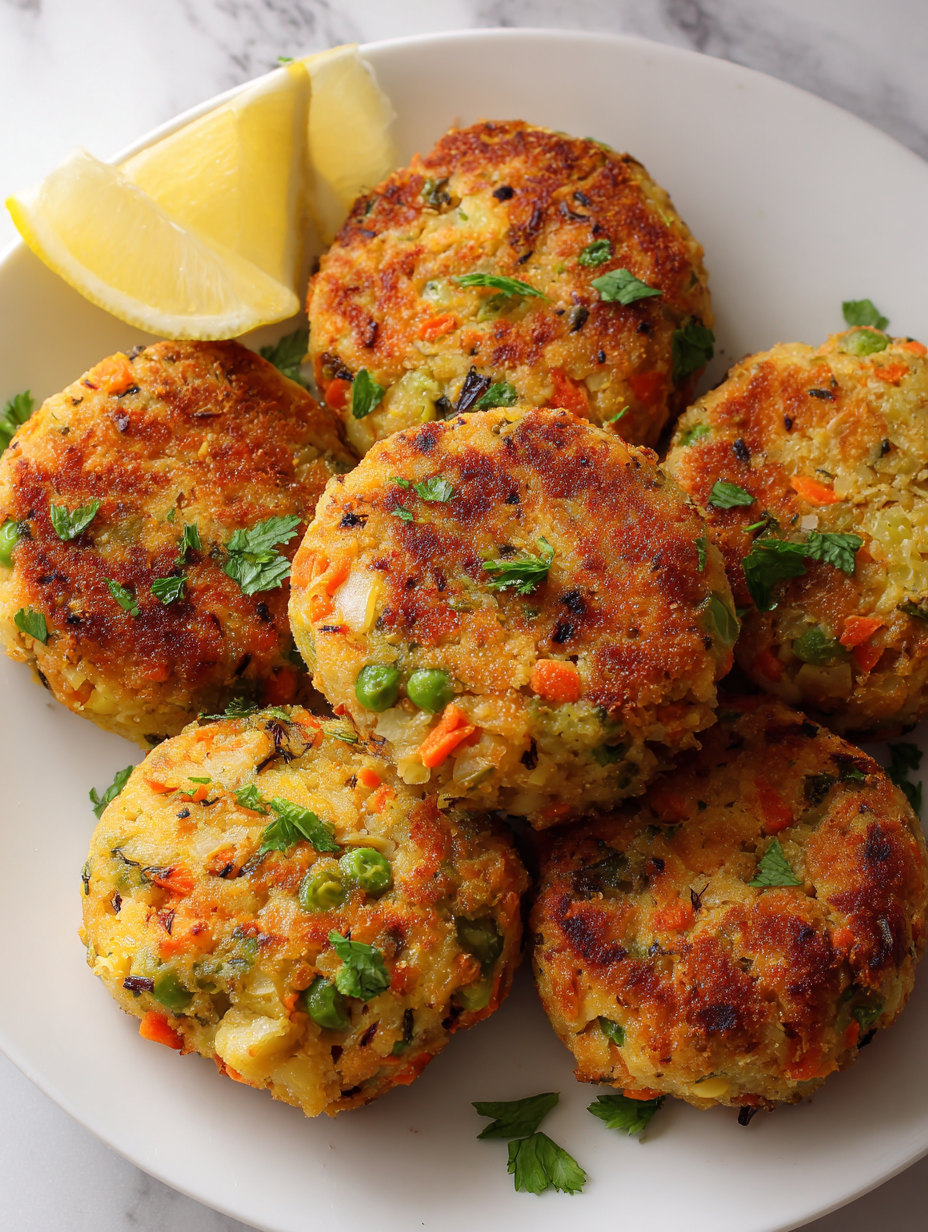
Step-by-step guide to baking cutlets
- Preheat your oven to 200°C (390°F). Line a baking sheet with parchment paper and lightly brush with oil. This keeps the cutlets from sticking and helps them crisp up evenly.
- Gather your vegetables: about 2 cups of grated carrots, 1 cup of mashed potatoes, and 1 finely chopped onion. Mix them in a large bowl. The mixture should be moist but hold together when shaped. Adjust with a little flour or breadcrumbs if too loose.
- Add spices and herbs: a teaspoon of cumin, half that of coriander, a pinch of salt, and a splash of lemon juice. Stir well. These flavors are what make the cutlets shine—don’t skip or skimp on the spices.
- Shape the mixture into small, flat patties about 1.5 cm thick. Use your hands or a cookie cutter for uniformity. Place them on the prepared baking sheet, leaving space between each.
- Brush the tops lightly with oil. This will help them turn golden and crispy in the oven. If you prefer a darker crust, a quick sprinkle of additional breadcrumbs on top can add crunch.
- Bake for 20-25 minutes. Halfway through, flip the cutlets gently and brush with a little more oil. They should be golden brown and firm around the edges when ready.
- Check for doneness: the edges should be crisp, and the cutlets should feel firm but not hard when pressed. The smell should be roasted, with spices fragrant and vegetables tender.
- Remove from oven and let rest for 5 minutes. This helps them firm up and makes flipping or serving easier. Finish with a squeeze of lemon or a dollop of yogurt if you like.
Let the baked cutlets rest for 5 minutes to set. Serve hot with your favorite chutney or yogurt. For presentation, stack or arrange on a platter, garnished with fresh herbs if desired.
How to Know It’s Done
- Edges are golden and crisp, not pale or soggy.
- Cutlet feels firm yet tender when pressed.
- Vegetables are soft and fragrant, not raw.
Baked Vegetable Cutlets
Ingredients
Equipment
Method
- Preheat your oven to 200°C (390°F). Line a baking sheet with parchment paper and lightly brush with oil to prevent sticking.
- In a large bowl, combine the grated carrots, mashed potatoes, and finely chopped onion. Mix well until the ingredients are evenly distributed and the mixture feels moist but holds together when shaped.
- Add the ground cumin, ground coriander, salt, and beaten egg to the vegetable mixture. Stir thoroughly to incorporate all the spices and binders, creating a cohesive mixture.
- Divide the mixture into four equal portions. Shape each into a flat, round patty about 1.5 cm thick using your hands. Place each patty carefully onto the prepared baking sheet, leaving space between them.
- Using a brush or your fingers, lightly brush the tops of each patty with oil. This helps them turn a beautiful golden color and become crispy during baking.
- Bake the cutlets in the preheated oven for 20-25 minutes. Flip them gently halfway through baking and brush with a little more oil if desired. They should be golden brown and crispy around the edges when done.
- Remove the cutlets from the oven and let them rest for about 5 minutes. This helps them set and makes handling easier, while the aroma of roasted spices fills your kitchen.
- Serve the baked vegetable cutlets hot, garnished with fresh herbs or a squeeze of lemon if desired. Enjoy their crispy exterior and tender inside as a wholesome snack or main dish.
Pro tips for perfect cutlets
- Bolded tip: Chill the mixture briefly before shaping to make handling easier and prevent sticking.
- Bolded tip: Use a gentle hand when forming patties to keep them uniform and prevent cracking.
- Bolded tip: Brush the cutlets with oil right before baking for a shiny, crispy exterior.
- Bolded tip: Flip the cutlets halfway through baking to ensure even browning and crispness on both sides.
- Bolded tip: Keep an eye on the oven during the last few minutes to avoid over-browning or burning.
- Bolded tip: For extra crunch, sprinkle a little more breadcrumbs on top before baking and press lightly.
- Bolded tip: Let the baked cutlets rest for a few minutes after coming out of the oven to firm up and prevent breaking.
Common mistakes and how to fix them
- FORGOT to preheat the oven → Always preheat to ensure even cooking.
- DUMPED all vegetables together → Mix vegetables thoroughly for uniform flavor and texture.
- OVER-TORCHED the cutlets → Keep an eye on them; remove once golden and crispy.
- SKIPPED resting time → Rest for 5 minutes to set the shape and improve texture.
Quick fixes and pantry swaps
- When mixture feels too loose, splash in a little extra breadcrumbs to help it hold shape.
- If cutlets stick to the baking sheet, patch with a quick brush of oil and a sprinkle of breadcrumbs.
- Splash a few drops of lemon juice if the spices feel dull after baking.
- Shield over-browned edges with foil if they turn too dark before cooking through.
- Rescue a soggy batch by broiling for 2-3 minutes until crispy and fragrant.
Prep, store, and reheat tips
- Prepare the vegetable mixture a day in advance; keep refrigerated to allow flavors to meld and save time on busy mornings.
- Shape the cutlets and store them in an airtight container in the fridge for up to 24 hours; they’ll firm up for easier baking.
- Reheat baked cutlets in a 180°C (350°F) oven for 8-10 minutes until warm and crispy; the aroma of toasted spices will return.
- For longer storage, freeze the uncooked cutlets on a tray, then transfer to a bag; they’ll last up to 2 months. Bake directly from frozen, adding 5-7 minutes.
- The flavors deepen slightly after refrigeration, with the spices becoming more pronounced. Expect a slightly softer texture after reheating, but still crisp on the outside.
Top questions about baked vegetable cutlets
1. How do I know when they’re done baking?
Use a crisp, golden exterior as your sign. When they crackle when pressed and smell toasted, they’re ready.
2. My cutlets are falling apart. What went wrong?
If they’re too soft or falling apart, chill the mixture for 15 minutes before shaping again.
3. How can I make the crust extra crispy?
For extra crispness, brush with oil halfway through baking and flip gently. Use Panko breadcrumbs for crunch.
4. Why are my cutlets soggy or stuck to the tray?
Use a baking sheet lined with parchment and avoid overcrowding to help them crisp evenly.
5. Can I substitute other vegetables in the recipe?
Swap in sweet potatoes for a sweeter flavor and softer texture, or zucchini for a milder taste.
6. What’s the ideal baking time and temperature?
Bake at 200°C (390°F) for 20-25 minutes, flipping halfway. They’re ready when golden and firm.
7. Can I make these vegan?
To veganize, replace eggs with mashed bananas or flaxseed mixture. Expect a slightly different texture but still tasty.
8. Should I let the cutlets rest before serving?
Rest them for 5 minutes after baking to let the shape set and improve texture before serving.
9. How should I store and reheat leftovers?
Store leftovers in fridge for up to 24 hours or freeze for up to 2 months. Reheat in oven for best crispness.
10. What if my mixture is too loose or over-browned?
If mixture feels too loose, add more breadcrumbs or flour. If over-browning, cover with foil to prevent burning.
Baked vegetable cutlets are a reminder that simplicity can be truly satisfying. The aroma of roasted spices and melting vegetables fills the kitchen, making it hard to wait. Each bite offers a tender, crispy contrast that keeps me coming back, especially on busy days when I need comfort without the fuss. These little bites aren’t just food—they’re a moment of honest, wholesome pleasure that’s easy to share and even easier to make. After all, the best recipes are the ones that bring a bit of warmth and familiarity, no matter how hectic life gets.
When these cutlets come out of the oven, I feel that quiet sense of accomplishment—like I’ve captured a bit of cozy home in every crispy edge. They’re perfect for a quick snack or a laid-back dinner, especially when I want something nourishing and straightforward. Sometimes, it’s the simplest dishes that remind us how good food can be, especially when it’s baked with care and a bit of love.

Hi, I’m James Whitmore, the creator behind Salt Evangelist. If there is one ingredient I believe deserves more respect, it is salt. Not because it makes food salty, but because it makes food come alive. Salt highlights sweetness, softens bitterness, sharpens acidity, and deepens savoriness. It is not just seasoning. It is transformation.

