This recipe is a little nod to kitchen scraps and a big shoutout to creativity. I’ve always kept leftover bread ends, thinking they’re just clutter, but turning them into mini pizzas feels like a small victory. It’s honest cooking—using what’s on hand and making it fun for everyone at the table.
What I love most is how adaptable this is. No need for perfect dough or fancy toppings—just bits and pieces from the fridge that might otherwise go to waste. It’s a messy, satisfying way to turn everyday ingredients into something hot, cheesy, and totally customizable.
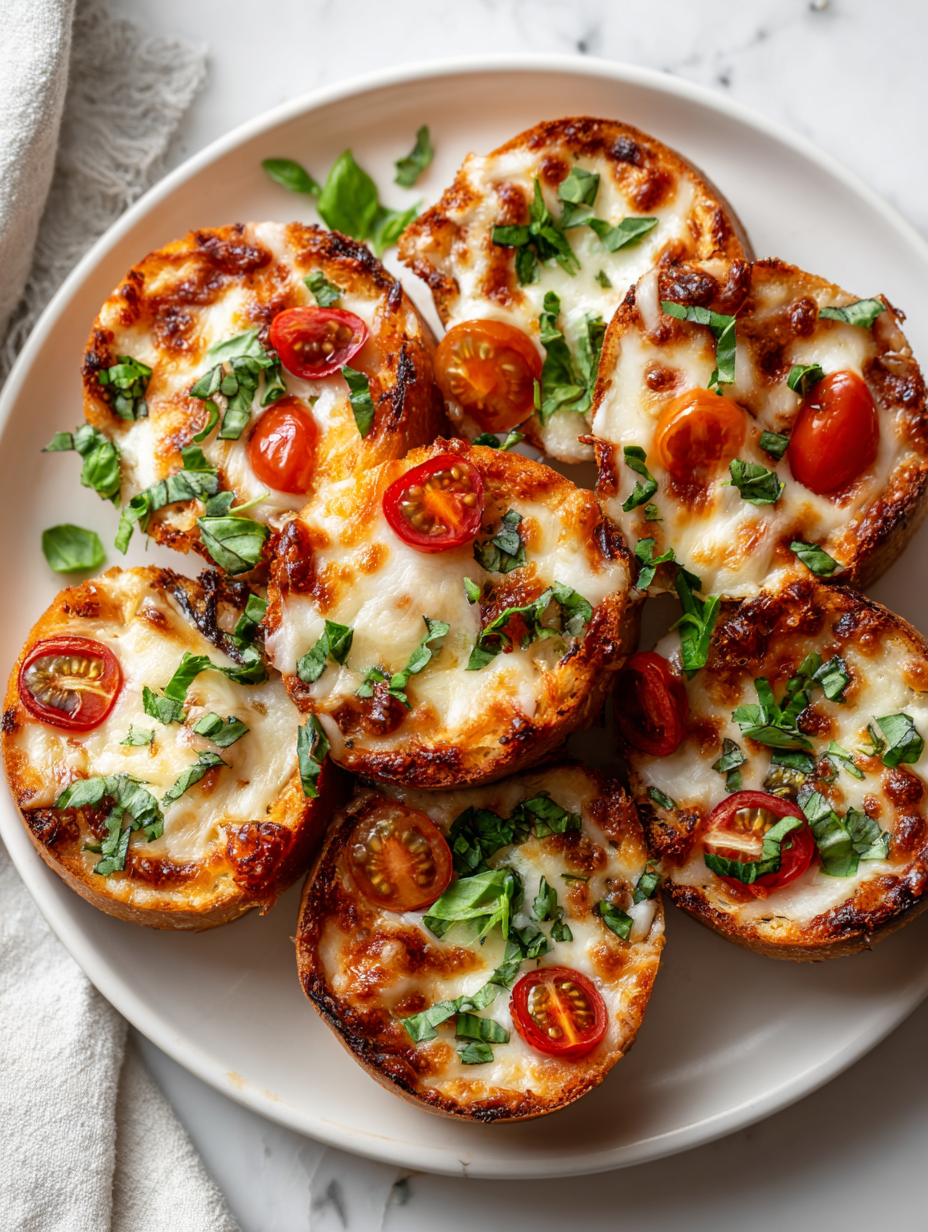
Focusing on making mini pizzas with leftover bread ends and scraps, transforming what might be discarded into a fun, customizable snack. This approach turns everyday kitchen clutter into a playful, satisfying meal, emphasizing resourcefulness and creativity in the kitchen.
Turning Scraps into Snack
- Making these mini pizzas feels like a small act of rebellion—using bread ends instead of tossing them out.
- I get a little proud watching kids devour these, especially knowing I turned leftovers into something special.
- There’s a nostalgic joy in spreading out toppings and watching everything bubble and crisp up in the oven.
- These mini pizzas are chaotic but cozy—perfect for lazy weekends or quick snacks that feel like a treat.
Turning Scraps into Snack
- This recipe came from a lazy Sunday afternoon, when I found a stash of bread ends and a fridge full of odds and ends. Instead of tossing them, I started layering toppings on the bread, and suddenly it felt like a playful, imperfect pizza party. It’s funny how a simple idea can turn into a little kitchen rebellion, turning scraps into smiles.
- I remember the first time I made these for friends—watching everyone dig in, cheeks puffed with cheese and surprise. It’s become a go-to when I want something quick, satisfying, and a little messy. There’s a joy in improvising, in making something delicious with just what’s on hand, especially when it’s this easy.
- heading: Turning Scraps into Snack
Mini Pizzas’ Surprising History
- Mini pizzas have roots in Italian street food, where small, handheld snacks were essentials for quick bites.
- This recipe style gained popularity in the 1950s when post-war convenience foods made small, customizable meals trendy.
- Using bread ends or scraps for mini pizzas is a modern twist that emphasizes zero-waste cooking and resourcefulness.
- Historically, small, personal pizzas allowed for varied toppings, making them a versatile and social food among friends.
Key Ingredients Breakdown
- Pre-shredded mozzarella: I love how quick and gooey it melts, but if you prefer a softer bite, try fresh mozzarella—just tear it into small pieces. The store-bought kind saves time and stays consistent.
- Bread ends: These are my secret weapon—crusty, chewy, and perfect for mini bases. If you don’t have bread ends, thinly sliced baguette slices work just as well. Watch for that toasted aroma when they’re just right.
- Tomato sauce: I use a simple canned crushed tomato, seasoned with a pinch of salt and garlic powder. For a punch of brightness, add a splash of lemon juice or a sprinkle of crushed red pepper—your call.
- Toppings (pepperoni, veggies): Whatever’s in the fridge—thinly sliced, so they cook evenly. For a smoky flavor, throw on some chopped smoked paprika or charred peppers. The key is layering flavors, not piling high.
- Olive oil: Just a drizzle before baking—brings a subtle richness and helps toppings crisp up. If you want extra flavor, infuse it with a hint of rosemary or garlic. The aroma will perk up your kitchen.
- Herbs and spices: Fresh basil or oregano are classic, but dried works fine too. Just sprinkle over hot out of the oven so they release their fragrant oils. A pinch of flaky sea salt at the end ties everything together.
- Optional: A dash of balsamic glaze or honey after baking adds a sweet, tangy contrast that elevates even simple toppings. Use sparingly, almost like a secret ingredient.
Spotlight on key ingredients
Mozzarella cheese:
- Pre-shredded mozzarella: I love how quick and gooey it melts, but if you prefer a softer bite, try fresh mozzarella—just tear it into small pieces. The store-bought kind saves time and stays consistent.
- Bread ends: These are my secret weapon—crusty, chewy, and perfect for mini bases. If you don’t have bread ends, thinly sliced baguette slices work just as well. Watch for that toasted aroma when they’re just right.
Tomato sauce:
- Bread ends: These are my secret weapon—crusty, chewy, and perfect for mini bases. If you don’t have bread ends, thinly sliced baguette slices work just as well. Watch for that toasted aroma when they’re just right.
- I use a simple canned crushed tomato, seasoned with a pinch of salt and garlic powder. For a punch of brightness, add a splash of lemon juice or a sprinkle of crushed red pepper—your call.
Notes for ingredient swaps
- Dairy-Free: Swap mozzarella for shredded cashew cheese or a vegan cheese blend—less gooey, but still melts nicely.
- Gluten-Free: Use thin slices of roasted sweet potato or zucchini as bases—they cook quickly and add a fresh, earthy flavor.
- Low-Sodium: Choose unsalted tomato sauce and skip added salt; enhance flavor with fresh herbs or a squeeze of lemon.
- Vegan Toppings: Skip meat and cheese; instead, load up with roasted veggies, olives, and a drizzle of balsamic glaze for complexity.
- Herb Variations: Fresh basil is classic, but try cilantro or parsley for a different, bright note and lively aroma.
- Crust Alternatives: Use naan or pita bread slices—they’re thicker or thinner depending on your preference and bake faster.
- Spicy Kick: Add crushed red pepper or hot sauce to the sauce layer for those who like a little heat in every bite.
Equipment & Tools
- Baking sheet: To hold and bake the mini pizzas evenly.
- Pastry brush: To evenly oil the bread slices.
- Sharp knife: To slice bread ends into thin rounds.
- Oven: To bake and melt the toppings.
Step-by-step guide to mini pizzas
- Gather your equipment: a baking sheet, a small spoon, a sharp knife, and a pastry brush or brush for oil.
- Preheat your oven to 200°C (390°F). Line the baking sheet with parchment or a silicone mat.
- Slice the bread ends into small, thin rounds about 1/2 inch thick. These are your mini bases.
- Lightly brush each bread slice with olive oil, focusing on the edges for crispiness.
- Spread a thin layer of tomato sauce on each bread piece, about 1 teaspoon. Don’t overload, or they’ll get soggy.
- Sprinkle shredded mozzarella evenly over the sauce—aim for a light, even coating.
- Add your toppings: slices of pepperoni, chopped veggies, or whatever you like. Keep toppings thin and small for quick cooking.
- Place the mini pizzas on the prepared baking sheet. Bake for 8-10 minutes, until cheese is bubbling and edges are golden.
- Check for doneness: cheese should be melted and slightly browned, edges crisp, toppings hot and cooked through.
- Remove from oven and let rest for 2 minutes. Drizzle with a little olive oil or sprinkle fresh herbs if desired.
- Serve hot directly from the oven—these are best crispy and cheesy, fresh from baking.
Let the mini pizzas rest for 2 minutes. Then, drizzle with olive oil or scatter fresh herbs. Serve immediately while crispy and cheesy.
How to Know It’s Done
- Cheese is bubbling and edges are golden brown.
- Toppings are cooked through and slightly crisp.
- Bread is toasted and not soggy, with a firm crust.
Mini Pizzas from Leftover Bread Ends
Ingredients
Equipment
Method
- Preheat your oven to 200°C (390°F) and line a baking sheet with parchment paper or a silicone mat.
- Use a sharp knife to slice the bread ends into small, thin rounds about 1/2 inch thick, creating mini bases for your pizzas.
- Lightly brush each bread slice with olive oil using a pastry brush or the back of a spoon, focusing on the edges to help them crisp up nicely.4 slices bread ends
- Spread about 1 teaspoon of tomato sauce evenly on each bread slice, covering the surface but avoiding overload to prevent sogginess.4 slices bread ends
- Sprinkle a generous layer of shredded mozzarella over the sauce, ensuring an even, light coating for gooey cheesiness.4 slices bread ends
- Top each mini pizza with your choice of sliced pepperoni, chopped vegetables, or other toppings, placing them evenly for balanced cooking.4 slices bread ends
- Arrange the mini pizzas on the prepared baking sheet, leaving space between each for crisping.
- Bake in the preheated oven for 8-10 minutes, until the cheese is bubbling and edges are golden brown.
- Check the pizzas: they should have crispy edges, melted cheese, and toppings cooked through. If needed, broil for an additional 1-2 minutes for extra crispness.
- Remove from the oven and let rest for 2 minutes to allow the cheese to set.
- Garnish with fresh herbs if desired, then serve hot and enjoy your resourceful, cheesy mini pizzas.4 slices bread ends
Notes
Tips for perfect mini pizzas
- Bolded mini-head: Use a light hand with toppings to prevent sogginess—less is more for crisp edges.
- Bolded mini-head: Brush bread lightly with olive oil—this helps achieve a golden, crispy crust.
- Bolded mini-head: Keep toppings thin and uniform—ensures even melting and prevents heavy, undercooked spots.
- Bolded mini-head: Bake on the middle rack—hot air circulation crisps the bread evenly without burning edges.
- Bolded mini-head: Check cheese bubbling and edges golden—remove from oven promptly to avoid over-torching.
- Bolded mini-head: Rest for 2 minutes after baking—this helps cheese set and makes handling easier.
- Bolded mini-head: If cheese isn’t melting well, increase oven temperature slightly or broil for a quick finish.
Common mistakes and how to fix them
- FORGOT to preheat oven → Always preheat to 200°C (390°F) for even baking.
- DUMPED toppings before cheese → Add toppings after cheese melts for better adherence.
- OVER-TORCHED edges → Cover with foil if edges brown too quickly, then remove to crisp.
- MISSED resting time → Let pizzas rest 2 minutes for cheese setting and easier handling.
Quick fixes and pantry swaps
- When in doubt, splash a little water on the oven rack to shimmer the cheese quickly.
- If cheese isn’t melting, open the oven door slightly—heat escapes, speeding up melting.
- Splash a tiny bit of olive oil on toppings before baking for extra crispness and shine.
- Patch soggy bases by broiling for 30 seconds—keep a close eye to avoid burning.
- DUMPED toppings before cheese? Layer cheese first, then toppings for even melting and flavor.
Prep, store, and reheat tips
- Prepare bread slices and assemble toppings ahead—store separately in airtight containers for up to 24 hours. The bread stays crusty, toppings stay fresh and colorful.
- Assembled mini pizzas can be kept in the fridge for up to 24 hours; reheat directly on a hot baking sheet for crispness.
- Shelf life for leftovers is about 1 day; cheese may dry out slightly, and toppings could lose some vibrancy. Best enjoyed fresh or reheated until bubbly.
- Reheat in a preheated 200°C (390°F) oven for 5-7 minutes. Look for bubbling cheese and edges that are crisp and golden. Avoid microwaving unless you want soggy bottoms and melted toppings.
Top questions about mini pizzas
1. Can I use regular bread instead of bread ends?
Use bread ends or thin baguette slices; they crisp up nicely in the oven, giving that perfect mini pizza base.
2. How do I know when the mini pizzas are done?
Preheat your oven to 200°C (390°F). Bake the mini pizzas on the middle rack until cheese bubbles and edges are golden, about 8-10 minutes.
3. Can I make these vegan?
Yes! Swap dairy cheese for vegan cheese or omit altogether. Use extra veggies or hummus for flavor and creaminess.
4. How much topping should I use?
Keep toppings thin and evenly spread. Too much makes them soggy; thin layers melt better and stay crispy.
5. How should I store and reheat leftovers?
Store leftovers in an airtight container in the fridge for up to 24 hours. Reheat in a hot oven for best crispness.
6. How do I prepare the bread bases?
Use a sharp knife to cut bread ends into small rounds. A quick brush with olive oil helps them crisp up during baking.
7. Why are my mini pizzas soggy?
Avoid overcrowding toppings; keep them small and sparse. This ensures even cooking and prevents sogginess.
8. What equipment do I need?
Use a baking sheet lined with parchment paper or a silicone mat for easy cleanup and even baking.
9. My cheese isn’t melting properly, what do I do?
If cheese isn’t bubbling, increase oven temperature slightly or broil for 30 seconds to melt toppings quickly.
10. Can I customize the toppings?
Feel free to customize with your favorite toppings—think smoked paprika, fresh herbs, or a drizzle of balsamic for extra flavor.
These mini pizzas are a smart way to make use of what’s already in your kitchen, turning scraps into something satisfying. They’re cozy, imperfect, and honestly, just fun to throw together on a busy night or when you want something cheesy fast.
More than anything, they remind me that good food doesn’t have to be complicated. A little chaos, a pinch of creativity, and a hot oven are all you need to pull off a little snack that feels like a treat—and tastes like it too.

Hi, I’m James Whitmore, the creator behind Salt Evangelist. If there is one ingredient I believe deserves more respect, it is salt. Not because it makes food salty, but because it makes food come alive. Salt highlights sweetness, softens bitterness, sharpens acidity, and deepens savoriness. It is not just seasoning. It is transformation.

