Cheese balls are one of those retro party staples I can’t resist tinkering with. This version sneaks in finely chopped pickles and a dash of hot sauce, transforming the usual creamy, cheesy sphere into a tangy, spicy bite that keeps everyone guessing. It’s simple, but the unexpected zing makes it feel fresh and fun in a way that surprises even the most seasoned snackers.
I’ve made cheese balls for countless gatherings, but this twist always steals the spotlight. It’s the kind of dish that sparks conversations and gets passed around endlessly. Honestly, I love how just a few small ingredients can turn a familiar comfort food into something lively and memorable—perfect for when you want to shake up your usual appetizer game.
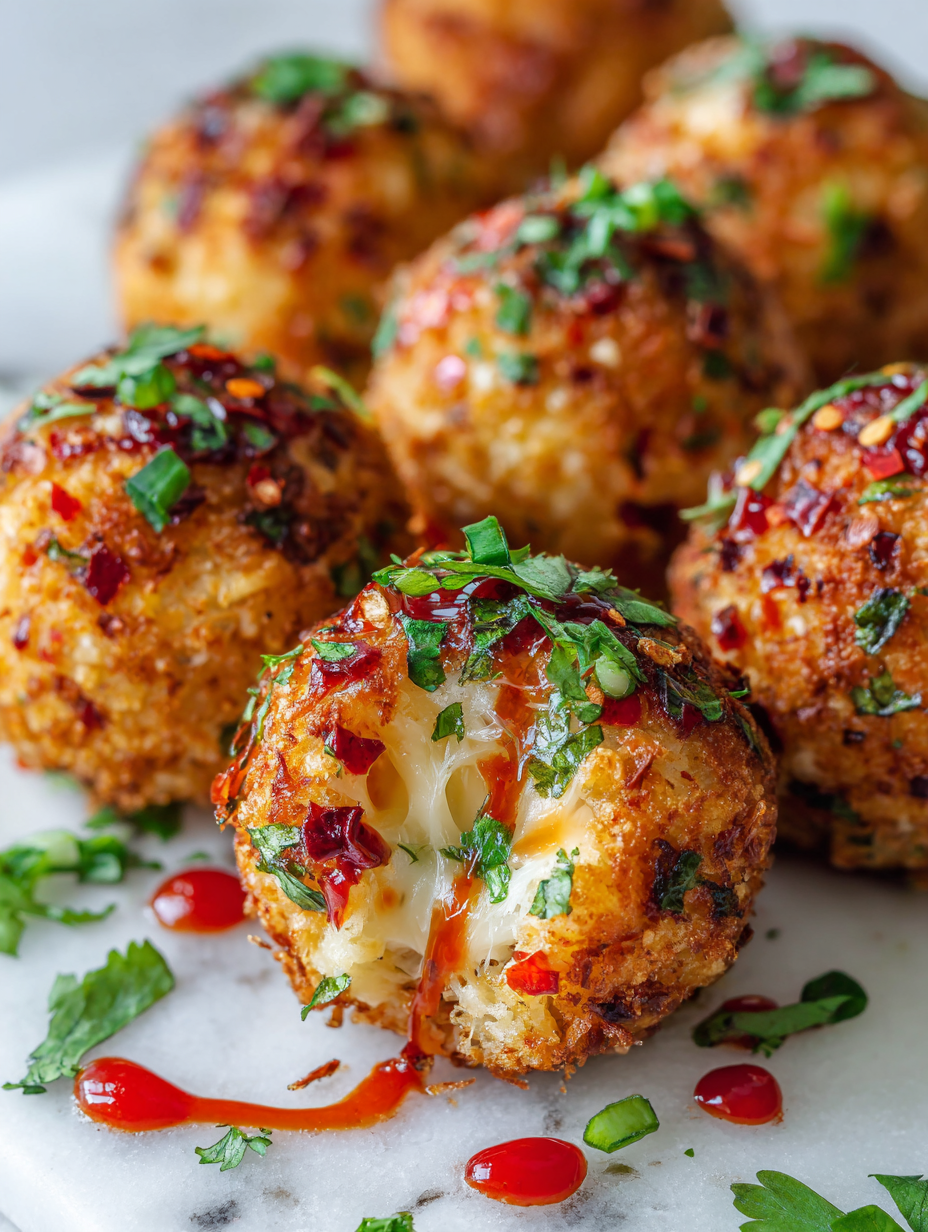
Focusing on the unexpected delight of adding finely chopped pickles and a dash of hot sauce to the cheese ball, turning a classic appetizer into a tangy, spicy surprise that sparks conversations and keeps everyone reaching for more.
A Cheeseball with a Twist
- I remember the first time I made this for a chaotic game night—everyone was fighting over the last crumb.
- There’s a quiet pride in shaping a perfect round cheese ball after a long day, feeling the cool, creamy mixture under my fingers.
- This recipe brings back memories of holiday gatherings, where the smell of melting cheese and toasted nuts filled the air.
- I love how a simple cheese ball can turn into a centerpiece—it’s cheesy, a little messy, but always a hit.
- Making this feels like a small act of rebellion—breaking out from bland appetizers into something wildly flavorful and unexpected.
The story behind this recipe
- This cheese ball started as a way to use up odds and ends in my fridge. I wanted something that felt familiar but with a little kick of surprise. The first time I added chopped pickles and hot sauce, it was a game-changer—suddenly, it wasn’t just cheesy, it was lively and addictive.
- Making this cheese ball reminds me of lazy Sunday afternoons with friends, passing around snacks and cracking jokes. It’s the kind of dish that’s easy to throw together but feels special enough to serve for any gathering. I love how a simple mix can turn into a messy, flavorful centerpiece that everyone reaches for.
- heading: The story behind this recipe
Cheese Ball Trivia & Origins
- Cheese balls gained popularity in the mid-20th century as a convenient, crowd-pleasing appetizer for parties and potlucks.
- Originally, cheese balls were often coated with nuts, herbs, or paprika, adding texture and visual appeal.
- The classic cheese ball has roots in American home cooking, especially in the 1950s when processed cheese became widely available.
- Some believe the cheese ball evolved from European cheese spreads, adapted for casual, communal snacking.
- Quirky trivia: In the 1970s, cheese balls were sometimes shaped into themed forms, like pumpkins or holiday ornaments, for seasonal parties.
Breakdown of Key Ingredients
- Cream Cheese: I love how it’s silky and rich, giving the cheese ball its creamy base. If you want a lighter version, try Greek yogurt—just expect a slightly tangier flavor.
- Shredded Cheddar: Provides a sharp, cheesy punch that melts in your mouth. Swap for Monterey Jack if you prefer a milder, mellower taste.
- Finely Chopped Pickles: These add a tangy crunch that surprises the palate. For less acidity, use chopped olives or capers instead; just tweak the salt a bit.
- Hot Sauce: Brings a lively kick, making every bite more exciting. Use sriracha for sweetness, or omit if you want a milder, more traditional flavor.
- Garlic Powder: It’s the secret to a subtle, savory depth. Fresh garlic can be a fuss—try roasted garlic for a mellow, caramelized sweetness instead.
- Chopped Nuts (optional): Adds crunch and visual appeal. Toast them first for extra aroma, or skip if allergies are a concern or you prefer a softer texture.
Spotlight on key ingredients
Cream Cheese:
- I love how it’s silky and rich, giving the cheese ball its creamy base. If you want a lighter version, try Greek yogurt—just expect a slightly tangier flavor.
- Shredded Cheddar: Provides a sharp, cheesy punch that melts in your mouth. Swap for Monterey Jack if you prefer a milder, mellower taste.
- Finely Chopped Pickles: These add a tangy crunch that surprises the palate. For less acidity, use chopped olives or capers instead; just tweak the salt a bit.
Chopped Nuts:
- Hot Sauce: Brings a lively kick, making every bite more exciting. Use sriracha for sweetness, or omit if you want a milder, more traditional flavor.
- Adds crunch and visual appeal. Toast them first for extra aroma, or skip if allergies are a concern or you prefer a softer texture.
Notes for ingredient swaps
- Dairy-Free: Swap cream cheese for a cashew-based spread or dairy-free soft cheese. Expect a slightly nuttier, less tangy flavor.
- Cheddar: Use Monterey Jack or mozzarella for a milder, creamier bite. For sharper notes, try aged Parmesan or Pecorino.
- Pickles: Substitute with chopped olives or capers for a less tangy, saltier punch, or omit for a subtler flavor.
- Hot Sauce: Switch to sriracha for sweetness and heat, or use a dash of smoked paprika for depth without heat.
- Nuts: Replace toasted nuts with crushed pretzels or crispy fried onions for crunch and texture variation.
- Herbs & Seasonings: Add chopped chives, parsley, or a pinch of smoked paprika to customize the flavor profile. Skip if you prefer a simpler taste.
Equipment & Tools
- Mixing bowl: To combine and blend the ingredients smoothly.
- Spatula or spoon: For mixing ingredients thoroughly.
- Plastic wrap: To shape and chill the cheese ball without sticking.
- Skillet: To toast the nuts for added crunch and aroma.
- Serving platter: To present the finished cheese ball attractively.
Step-by-step guide to cheese ball
- Gather all your ingredients: cream cheese, shredded cheddar, chopped pickles, hot sauce, garlic powder, and optional nuts. Make sure the cream cheese is softened at room temperature for easy mixing.
- In a large mixing bowl, combine 8 oz of softened cream cheese with 1 cup of shredded cheddar. Mix until smooth and creamy, using a spatula or spoon. Keep the mixture cool if it’s too soft to handle.
- Add 2 tablespoons of hot sauce and 1 teaspoon of garlic powder to the cheese mixture. Stir well, tasting for heat and seasoning balance. If you want more spice, add a dash more hot sauce.
- Fold in 1/2 cup of finely chopped pickles. Mix evenly, ensuring the chunks are distributed throughout. For a milder tang, substitute with chopped olives or capers.
- Shape the mixture into a ball, about the size of a grapefruit. Use your hands or a small ice cream scoop for a cleaner shape. Wrap it in plastic wrap and chill in the fridge for at least 30 minutes to firm up.
- While it chills, toast 1/4 cup of chopped nuts in a dry skillet over medium heat until golden and fragrant—about 3-4 minutes. Let cool.
- Remove the cheese ball from the fridge. Roll it in the toasted nuts to coat evenly, pressing gently to adhere. If you prefer no nuts, skip this step or roll in chopped herbs for a fresh finish.
- Place the finished cheese ball on a serving platter. Garnish with extra chopped pickles or herbs if desired. Serve with crackers, sliced baguette, or veggie sticks.
- For best flavor, let the cheese ball sit at room temperature for 10-15 minutes before serving. This enhances the aroma and makes it easier to spread or cut.
Chill the cheese ball for at least 30 minutes to firm up. Serve at room temperature for the best flavor and texture, garnished with extra herbs or pickles if desired.
How to Know It’s Done
- Color: The cheese ball should be evenly coated with toasted nuts or herbs, with a firm but slightly soft texture when pressed.
- Appearance: The exterior should be smooth and well-rounded, with no cracks or cracks evident in the coating.
- Texture: When gently pressed, it should jiggle slightly but hold its shape without crumbling.
Tangy Spicy Cheese Balls
Ingredients
Equipment
Method
- Gather all ingredients and ensure the cream cheese is softened to a creamy, scoopable consistency.
- In a large mixing bowl, combine the softened cream cheese and shredded cheddar cheese, stirring until smooth and well blended. The mixture should be creamy and uniform, with no lumps.
- Add hot sauce and garlic powder to the cheese mixture, folding in thoroughly until the mixture develops an even, slightly spicy aroma.
- Fold in the finely chopped pickles evenly, distributing the tangy bits throughout the mixture.
- Shape the cheese mixture into a tight, smooth ball using your hands or a small scoop, pressing firmly to avoid cracks, then wrap in plastic wrap and refrigerate for at least 30 minutes to firm up.
- While the cheese ball chills, toast the chopped nuts in a dry skillet over medium heat until golden and fragrant, about 3-4 minutes. Cool slightly.
- Remove the chilled cheese ball from the fridge and roll it gently in the toasted nuts, pressing lightly to coat evenly with a crunchy layer.
- Transfer the coated cheese ball to a serving platter. Garnish with extra chopped pickles or herbs if desired, and serve with crackers or veggie sticks.
Tips and tricks for best results
- Chill the mixture: Ensure the cheese mixture is well chilled before shaping to prevent sticking and make handling easier.
- Toast the nuts: Toast nuts until golden and fragrant for maximum flavor and crunch, then cool before rolling the cheese ball in them.
- Use room temp cream cheese: Softened cream cheese blends smoothly; if cold, it’ll be lumpy and hard to mix evenly.
- Don’t overmix: Mix just until combined to keep the cheese ball light and prevent it from becoming too dense or greasy.
- Shape with damp hands: Keep your hands slightly damp when forming the ball to prevent sticking and get a smooth surface.
- Serve at room temperature: Let the cheese ball sit out for 10-15 minutes before serving to enhance flavor and spreadability.
- Add a layer of herbs: Rolling the finished cheese ball in chopped herbs or spices adds visual appeal and fresh flavor contrast.
Common mistakes and how to fix them
- FORGOT to chill the cheese ball before coating? Chill for at least 30 minutes to set.
- DUMPED the nuts in too hot? Toast until golden and fragrant, then cool before rolling.
- OVER-TORCHED the nuts? Keep a close eye; nuts toast quickly and can burn in seconds.
- MISSED the sensory check? Ensure it jiggles slightly but holds shape, with even coating.
Quick Fixes & Pantry Swaps
- If sauce is too thick, splash in a little warm water and stir until smooth.
- When nuts are unevenly toasted, patch with a quick 30-second microwave blast to revive aroma.
- Splash a bit of lemon juice if cheese ball tastes too salty or metallic.
- Patch cracks by gently pressing the surface back together with damp fingers.
- Shield cheese ball with plastic wrap if it starts to crack in the fridge, keeping moisture in.
Prep, store, and reheat tips
- You can prepare the cheese mixture and shape the ball up to 24 hours in advance. Keep it tightly wrapped in plastic wrap in the fridge; the flavors deepen overnight, and it firms up nicely.
- Store the finished cheese ball in an airtight container or wrapped well in plastic in the fridge for up to 3 days. The tang from the pickles and the richness of the cheese mellow slightly, creating a more integrated flavor.
- Reheating isn’t necessary; serve it straight from the fridge or let it sit at room temperature for about 10 minutes to soften slightly, enhancing aroma and spreadability.
- If the cheese ball feels too firm after refrigeration, briefly let it sit out to soften, or gently re-roll in nuts or herbs for a fresh appearance and added crunch before serving.
- For longer storage, freeze the uncoated cheese ball wrapped tightly in plastic and foil for up to a month. Thaw in the fridge overnight, then re-roll in nuts or herbs for presentation.
Top questions about cheese balls
1. Can I use Greek yogurt instead of cream cheese?
Yes, you can substitute cream cheese with Greek yogurt for a tangier, lighter version, but it might be less creamy.
2. Can I swap the cheddar for another cheese?
Absolutely. Cheddar is classic, but Monterey Jack or mozzarella work well for milder, melted cheese flavors.
3. What if I don’t like pickles?
Yes, chopped olives or capers can replace pickles for a less tangy, saltier punch, or omit for a subtler taste.
4. Can I leave out the hot sauce?
Hot sauce adds spice and liveliness; sriracha is a good sweet-spicy option. Omit for a milder flavor.
5. Are nuts necessary for the coating?
You can skip nuts or replace them with crushed pretzels or crispy onions for crunch and visual interest.
6. How long should I chill the cheese ball?
Chill the shaped cheese ball for at least 30 minutes to help it set and make it easier to coat.
7. When should I serve the cheese ball?
Serve at room temperature for the best flavor and spreadability, about 10-15 minutes out of the fridge.
8. How do I shape the cheese ball without it sticking?
Use a damp hand to shape the cheese ball to prevent sticking and get a smooth finish.
9. My mixture is too runny—what do I do?
If the cheese mixture is too soft, chill it longer or add a little more shredded cheese for firmness.
10. How long can I keep a cheese ball in the fridge?
Leftovers can be stored in the fridge for up to 3 days, but the flavor becomes more mellow with time.
This cheese ball isn’t just a throwback; it’s a little act of rebellion against the plain, predictable snacks. The tang of pickles and the spicy kick keep everyone coming back for more, especially as it sits and melds flavors overnight. It’s chaos in a ball—messy, cheesy, and totally worth it.
When you serve this, you’re not just offering a dip, but a story—one of simple ingredients, unexpected twists, and good, honest flavor. It’s perfect for casual nights or when you need something quick but memorable. No matter the occasion, it’s a dish that invites a little chaos and a lot of smiles.

Hi, I’m James Whitmore, the creator behind Salt Evangelist. If there is one ingredient I believe deserves more respect, it is salt. Not because it makes food salty, but because it makes food come alive. Salt highlights sweetness, softens bitterness, sharpens acidity, and deepens savoriness. It is not just seasoning. It is transformation.

